
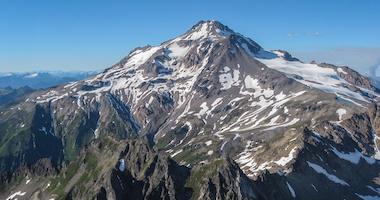


RMI's Expedition Skills Seminar – Mt. Shuksan is a six day instructional mountaineering course with a summit attempt of Mt. Shuksan via the Sulphide Glacier.

EXPEDITION HIGHLIGHTS
- Six days of extensive training on the picturesque Mt. Erie and Mt. Shuksan's Sulphide Glacier.
- Mt. Erie overlooks the Puget Sound, with panoramic views of the San Juan Islands, the Olympics, and several of the Cascade volcanoes.
- An expedition-style climb allows us to establish successive tented camps as we ascend the Sulphide Glacier in preparation for our summit bid.
- The diverse terrain of the North Cascades and Mt. Shuksan is ideal for learning mountaineering skills and techniques on a program suited for novice mountaineers.


Our Expedition Skills Seminar on Mt. Shuksan (9,131') places emphasis on developing foundational mountaineering skills while ascending an iconic peak of the North Cascades. After a day of training basic climbing techniques on Mt. Erie, the team moves to Mt. Shuksan.
Establishing tented camps, we ascend the Sulphide Glacier using the mountain's terrain to learn mountaineering skills such as snow and ice anchors, crevasse rescue, ice climbing, fixed line travel, and other technical skills. Our summit attempt entails scaling the rock and snow of Mt. Shuksan's prominent summit pyramid.
RMI's Expedition Skills Seminar – Mt. Shuksan is ideal for climbers interested in building their mountaineering skills while visiting one of the jewels of the National Park system - North Cascades National Park. The diverse terrain and relaxed itinerary provide excellent training opportunities.
Our Expedition Skills Seminars are comprehensive training courses designed to educate climbers to the mountaineering skills needed to tackle the world's greatest peaks. Successful completion of the Expedition Skill Seminar – Mt. Shuksan will prepare you for many of our expeditions around the world, including Denali, and provides you with a foundation for other major glaciated mountains.
We lead the Expedition Skills Seminar – Mt. Shuksan at a 2 to 1 climber to guide ratio ensuring that you receive a high degree of hands-on instruction and have a small, efficient rope team during the summit ascent.

THE RMI DIFFERENCE
The Mountain Guides at RMI have a reputation as top guides in the United States. RMI Guides participated in some of America’s first ventures into the far reaches of the Himalaya. Years of expedition guiding and alpine climbing around the world have built a core of consummate professional guides.
Our guides are celebrated teachers and trainers, known for their leadership as well as their character. They possess the compassion, enthusiasm and ability to empower others and inspire them forward. Such qualities may only be found in people at the top of their profession. Despite their vast experience, RMI Guides still remember their own first steps into the mountains, and enjoy helping other climbers reach new heights.
Our exceptional focus to detail, our unparalleled level of climber attention, and our genuine excitement for these adventures make our programs truly memorable.

SAFETY
RMI strives to create the safest mountain experience possible. Our experienced team of guides focuses on leading fun and successful climbs without compromising safety. Each climb includes careful pre-trip planning, daily weather forecasts, avalanche forecasts, and diligent attention to detail. All RMI Guides are highly trained in remote medicine and rescue skills and carry comprehensive medical kits, rescue equipment, and radio communication equipment throughout the program. Regardless of the objective or the destination, safety remains RMI’s top priority.
As you prepare for your upcoming adventure please feel free to contact our office and speak directly to one of our experienced guides regarding equipment, conditioning, the route, or any other questions you may have about our programs. We are available Monday thru Friday 8:30 a.m. to 4:00 p.m. at (888) 89-CLIMB or [email protected].
Climber Reviews
Travel Consultant
RMI has partnered with Erin Rountree to provide comprehensive travel support. We have been working with Erin for many years. As an independent agent of the Travel Society, she has booked countless miles for adventure travelers across the globe and is extremely knowledgeable about the travel needs of our programs. Please call (208) 788-2870 or send email to [email protected].
Travel Insurance
We highly recommend travel insurance for this trip. Your travel insurance policy should include trip cancellation, trip interruption, trip delay, baggage loss or delay, medical expenses, and evacuation.
Navigating through the different options for travel insurance can be challenging. When purchasing Travel Insurance, here are a few items to consider:
- Read the fine print. Travel Insurance will reimburse you when canceling for a covered reason for prepaid, non-refundable trip costs that you insure. However, there are exclusions, so make sure you understand the “covered reasons.”
- Confirm that your activity is a covered “activity.” Not all travel insurance policies will offer coverage for activities such as mountaineering, climbing, skiing, or trekking adventures. Policies can also exclude coverage for activities due to the gear used (crampons, ice axe), activities that go above specific elevations, or activities in a particular region of the world. If there are exclusions, you may need to add an “Adventure” or “Sports” package to cover your activity.
- Verify that your state of residence is allowed with the policy that you are purchasing. Not all insurance companies offer policies in all 50 states.
- Contact your travel protection company directly for any questions you have regarding benefits or coverage.
We have partnered with Travelex Insurance and Harbor Travel Insurance because they offer certain policies specifically designed for adventure travel and offer coverage for remote areas and activities like mountaineering, climbing, skiing, and trekking, without any altitude restrictions.

For your convenience, we offer Travelex Insurance Services, Inc.(CA Agency License #0D10209) travel protection plans to help protect you and your travel investment against the unexpected.
For more information on the available plans visit Travelex Insurance Services or contact Travelex Insurance (800) 228-9792 and reference location number 47-0370.
The product descriptions provided here are only brief summaries. The full coverage terms and details, including limitations and exclusions, are contained in the insurance policy. Travel Insurance is underwritten by Berkshire Hathaway Specialty Insurance Company; NAIC #22276.
![]()
Harbor Travel Insurance covers the following critical benefits:
- Evacuation to a nearest appropriate hospital once hospitalized.
- Trip cancellation/interruption, primary medical expense coverage, sporting goods, baggage loss, emergency dental, AD&D, and more.
- Completely integrated one-stop program with a single contact for emergency services to travel assistance and insurance claims
- 24/7 access to paramedics, nurses, and military veterans.
Harbor Travel Insurance is powered by Redpoint Resolutions, a medical and travel security risk company. Their team is comprised of special operations veterans, paramedics, Stanford Medicine affiliated physicians, former intelligence officers, insurance actuaries, and global security experts with dozens of years of experience in theaters around the world. The Redpoint network covers the globe, making them uniquely equipped to provide elite rescue travel insurance – in every sense of the word.
Getting There
You are responsible for your own transportation to the program's trailhead. Most climbers will fly into Seattle-Tacoma International Airport (SEA) the evening before the program and rent a car for the 2-hour (depending on traffic congestion), 95-mile drive to Anacortes. Your team meets at the parking lot on the very top of Mt. Erie, in Anacortes. We meet at 8 a.m. Click here for driving directions.
On the second day of the program the team will rendezvous at Bingham Park, 322 W Munro Street in Sedro-Woolley. Click here for driving directions.
After a team meeting, we will drive to the climb's trailhead. You will need a Northwest Forest Service parking pass to leave your car at the trailhead. Passes are $30 and valid for one year. There may be an opportunity to leave some vehicles at the Ranger Station and carpool with other team members. Northwest Forest Service parking passes are available for sale at the ranger station.
Ride Share: If you are participating in a climb and are interested in sharing a ride, please post your information in the "Ride Share" forum of your North Cascades Discussion Board by logging into your RMI Account.
Area Accommodations
We suggest spending the night prior to the start of the trip either camping or lodging in the town of Anacortes. We suggest spending your next night in the town of Mt. Vernon or Sedro-Woolley to lessen your drive time in the morning.
Weather
For updated North Cascades weather forecasts, click here.
Tipping
Our guides work hard to ensure your well-being and success on the mountain. If you have a positive experience, gratuities are an excellent way to show your appreciation. Amounts are at your discretion and should be based on your level of enjoyment. Tips for excellent service normally average 10 – 15% of the cost of the program. If you would rather not bring the guide gratuity with you on the trip, you can send a check or call the RMI office to pay with a credit card upon your return.
Facts
North Cascades National Park has over 300 glaciers, more than any other park in the lower 48 states. More than half the glaciers in the 48 states are concentrated in this mountainous wilderness region called the North Cascades.
For more facts click here, and for even more click here.
Resources
General Information on North Cascades National Park.
North Cascades National Park map.
Communities & Activities outside North Cascades National Park, click here.
Qualifications
This trip is open to all individuals in excellent physical condition. There are no technical climbing prerequisites to join this program.
Get In The Best Shape Of Your Life And Then Go Climb A Mountain
Create A Fitness And Training Program
Physical Fitness Training
Mountaineering requires a high degree of physical stamina and mental toughness. Even for the healthiest and fittest individuals, climbing mountains qualifies as an extremely challenging endeavor.
- Start immediately. Start a rigorous fitness and training program now with the goal of arriving in top physical condition and confident in your skills.
- Be intentional. Focus on gaining the necessary strength, stamina and skills to meet the physical and technical demands of the climb.
- Be sport-specific. The best fitness and training program mimics the physical and technical demands of your climbing objective. The closer you get to your program date, the more your training should resemble the climbing.
For the Expedition Skills Seminar – Shuksan, you are preparing for:
- Steep hiking, climbing and glacier travel with a 50-60 lb load
- An 8 - 10 hour summit day
- Mountaineering techniques requiring core strength and flexibility
Nothing ensures a personally successful adventure like your level of fitness and training. Bottom line: Plan on being in the best shape of your life and ready for a very challenging adventure!
Below are approximate outlines of the program's physical demands that will be helpful in planning your training schedule and goals:
|
Total Climbing Time
|
Elevation Gain / Loss
|
Total Distance
|
Pack Weight
|
| DAY 1 — Skills Training Mt. Erie | |||
|
8 Hours
|
n/a
|
n/a
|
n/a
|
| DAY 2 — Hike to Sulphide Glacier | |||
|
5 - 6 Hours
|
Gain = 3,500'
|
4 miles
|
50 - 60 lbs
|
| DAY 3 — Skills Training | |||
|
5 - 6 Hours
|
Gain = 1,500'
Loss = 1,500'
|
2 miles
|
20 - 25 lbs
|
| DAY 4 — Skills Training | |||
|
5 - 6 Hours
|
Gain = 1,500'
Loss = 1,500'
|
2 miles
|
20 - 25 lbs
|
| DAY 5 — Summit Climb | |||
|
8 - 10 Hours
|
Gain = 3,125'
Loss = 3,125'
|
6 miles round trip
|
20 - 25 lbs
|
| DAY 6 — Descend to Trailhead | |||
|
2 - 3 Hours
|
Loss = 3,500'
|
4 miles
|
50 - 60 lbs
|
Please refer to our Resources for Mountaineering Fitness and Training for detailed fitness and training information.
Acclimatization
No acclimatization is necessary for this program.
What You’ll Need
A list of required personal equipment accompanies every RMI program, and the thought process behind each item is much greater than simply “preparing for the worst and hoping for the best.” The list for your program takes into account factors such as: seasonality, route conditions, weather, elevation and more. As such, this list is framed within the broadest of contexts and is dynamic by its very nature. Therefore, certain variables (additions and/or subtractions) are inherent within such an all-encompassing list. We make every effort to recommend only top of the line clothing and technical gear and it is never our intention for you to buy or rent unnecessary gear.
The Guide Pick is an example of the listed item, giving you an idea of the material and specifications of the item. This exact item does not need to be purchased or used; however, any item you choose must have similar characteristics and performance abilities to the Guide Pick.
RMI Guides concur on the potential necessity of every item, thus every item on the list is required at gear check. However, guides may also have suggestions derived from their experience, some of which will vary from a given list. The guides’ recommendation whether to bring along or leave behind certain item(s) comes during the gear check, when the team first meets. Occasionally this recommendation comes at the expense of having previously purchased an item. If a guide presents the option of leaving behind certain item(s) on the list of required equipment, it is for a reason. Their recommendation may be related to the weather, route conditions, freezing level, perceived strength of the party, or desired pack weight.
Ultimately, there will never be a consensus for a “perfect” equipment list for an ascent. It does not exist because of the multitude of variables faced by climbers throughout the climb. Please follow this equipment list closely so that you will arrive for the gear check with all the required items. Keep in mind the list is not black and white, fine tuning will occur once you meet with your guide. Have a great climb!
If you are planning on renting gear for your climb, there are two options. Please note rental items are not shipped. Pick-up/Drop-off is at the store location.
Northwest Mountain Shop - 820 Metcalf Street, Sedro-Woolley, WA 98284 | Phone: (360) 854-8761. Most of the required equipment is available for rent or purchase. Equipment can be reserved online.
Backcountry Essentials - 214 W Holly Street, Bellingham, WA 98225 | (360) 543-5678. Many of the required equipment items are available for rent or purchase. Equipment can be reserved online.
The Equipment Shop - American Alpine Institute - 1513 12th Street, Belllingham, WA 98225 | (360) 671-1570. Most of the required equipment is available for rent or purchase. Equipment can be reserved online.
Equipment List
Pack & Travel

Your pack must be large enough for your layers, climbing gear, and food, as well as a portion of your tent and your share of group equipment. You will not need a separate summit pack.
Sleeping Bag & Pad

We recommend a bag rated between 20° and 0° F. Allow ample room for movement. We recommend down over synthetic for its light weight, warmth, and packability. If climbing in April, May, June, or September, or if you know you sleep cold, consider a 0° F bag.

-450x0 (1).jpg)
Full-length inflatable or closed cell pad.
Technical Gear

The length of your axe depends on your height. Use the following general mountaineering formula: up to 5'8", use a 65 cm axe; 5'8" to 6'2", use a 70 cm axe; and taller, use a 75 cm axe. If you hold the axe so that it hangs comfortably at your side, the spike of the axe should still be a few inches above the ground.

We recommend a comfortable, adjustable alpine climbing harness. Removable, drop seat, or adjustable leg loops are convenient for managing your clothing layers over the course of the climb and facilitate going to the bathroom.

Used for clipping into the climbing rope.

Used for clipping into anchors, etc.


10-point or 12-point adjustable steel crampons with anti-balling plates designed for general mountaineering use.

Transceivers are required on all North Cascades programs before July. The RMI Office will notify climb participants if the transceiver is not needed for their climb after July 1st.

We recommend lightweight and collapsible poles with snow baskets.

A tube-style belay/rappel device that can accept a variety of rope diameters.

For practicing fixed line travel. You guides will also provide one to practice with. Most people prefer an ascender designed for their weak hand, leaving their strong hand free to hold their ice axe. For example, a right-handed person would use a left-handed ascender.

6 mm cordelette in one continuous length OR precut into two 4' sections OR two 13.5" Sterling Hollow Block sewn loops.
7 mm cordelette in one continuous length OR one 240cm dyneema sling.
Head

A UIAA (Union Internationale des Associations d’Alpinisme) or CE (European Committee for Standardization) certified climbing helmet.

Wool or synthetic. It should provide warmth but also be thin enough to fit underneath a climbing helmet.

A Buff provides versitile head and neck protection. A neck gaiter is also acceptable.

Start with fresh batteries and bring extra set(s) of batteries appropriate to the duration of the trip.

Glacier glasses are protective sunglasses that provide close to 100% frame coverage (wrap-around frames and side shields ensure no light can enter from the top, bottom, and sides of the glasses) and transmit less than 10% of visual light.

Amber or rose-tinted goggles for adverse weather. On windy days, climbers, especially contact lens wearers, may find photochromatic lenses the most versatile in a variety of light conditions.
Hands
Each glove layer is worn separately as conditions change during the climb.

Light weight liner or softshell gloves. Lighter colors absorb less sunlight while still offering UV protection.

Wind- and water-resistant, insulated mountain gloves.
Upper Body
We recommend a minimum of five upper body layers, all of which can be used in conjunction with each other. Two of these should be insulating layers, one light, and one medium, that fit well together. Today there are many different layering systems to choose from, including fleece, softshell, down, and synthetic options.

Long-sleeve wool or synthetic top. Light weight, light-colored, hooded baselayers (sun hoodys) are highly recommended for sun protection.

One step up in warmth and bulk from a baselayer. A technical fleece makes an ideal light weight insulating layer.

A down, synthetic, or softshell hoody makes a great midlayer.

An uninsulated, waterproof shell jacket with hood.

Your down or synthetic jacket should must have an insulated hood and be able to fit over the rest of your upper body layers. It will be worn primarily in camp and at rest breaks on summit day

We recommend a moisture-wicking, active-wear bra.
Lower Body
We recommend a system of four layers, all of which can be used in conjunction with each other. Products which combine several layers into one garment, such as traditional ski pants, don’t work well as they don’t offer the versatility of a layering system.

Non-cotton briefs or boxers.

Synthetic or wool.

Softshell climbing pants can be worn in combination with a base layer on colder days, or alone on warmer days.

Non-insulated, waterproof shell pants must be able to fit comfortable over your baselayer bottoms and softshell climbing pants. Full side zippers or 7/8 side zippers are required so that shell pants can be put on while wearing boots and crampons.

A light weight, synthetic pair of pants is a good option for the approach trek when hiking at lower altitudes and in warm conditions. These pants have no insulation, are typically made of thin nylon, and commonly feature zippers to convert between pants and shorts.
Feet

Insulated, full-shank, and crampon-compatible leather or synthetic single mountaineering boots are ideal for the North Cascades.

A pair of approach shoes or lightweight boots for approaches and hiking on rugged terrain after the snow melts (typically by mid-July). Can also be used as a camp shoe.

A knee-length pair of gaiters, large enough to fit over your mountaineering boots. This will protect you from catching your crampon spikes on loose clothing. Not needed if using a boot with an integrated gaiter.

Either wool or synthetic. Whatever sock combination you are accustomed to wearing during your training or previous adventures (whether single medium weight socks, a medium weight with a liner sock, two medium weight socks together, etc.), should work just fine for this climb.
First Aid & Medications

Our guides carry comprehensive medical kits, so keep yours small and light. We recommend a selection of adhesive bandages, antibiotic ointment, Moleskin and blister care, medical tape and/or duct tape, basic pain reliever, and personal medications.
Personal Items
-450x0.jpg)
See the Food tab for suggestions and quantities.

Packable plastic bowl. Collapsable models can work but must be handled carefully to avoid unintended collapsing. A lid is a great feature.

Insulated outdoor-style mug. We recommed a model with a removable lid, which helps retain heat and prevent spills. You may also choose to use 0.5L insulated bottle or a 0.5L nalgene.

A spoon or spork made of durable plastic or anodized metal. A long-handled spoon can be nice, especially if eating from a freeze-dried meal pouch.

One-liter water bottles with wide mouths made of co-polyester (BPA-free plastic).

Chlorine Dioxide water purification drops. Make sure to select the 30-minute version.


Heavy-duty trash compacter bags for use as waterproof pack/stuff sack liners. You can also use a a waterproof pack liner.

Include toilet paper, hand sanitizer, toothbrush and toothpaste, and wet wipes. Bring a quantity appropriate to the duration of your trip.

We recommend small tubes of SPF 30 or higher, which can be carried in pockets for easy access and to prevent freezing.


Spare prescription glasses if you wear contact lenses/eyeglasses.

Practice using this before coming on the climb!
One clearly-marked wide-mouth or collapsible bottle for overnight use.

Many smartphones have excellent cameras. Action cameras, small point-and-shoots, and compact dSLRs are lightweight and work well at altitude.

A small power bank, enough to charge a phone or e-reader several times.
Travel Clothes

We recommend bringing a selection of clothing to wear while traveling, site seeing and dining.
Pre-Trip Checklist
Purchase travel insurance.
Purchase airplane tickets.
Arrange transportation and lodging.
Reserve rental equipment.
Be in the best shape of your life!
Provided Equipment
RMI provides the following equipment for your program: tents, stoves, group cooking equipment, fuel, climbing ropes and anchors, and blue bags (for solid waste disposal).
Every guide on your climb will carry rescue equipment and a first aid kit. Each climb has two-way radios and a cell phone for emergency contact.
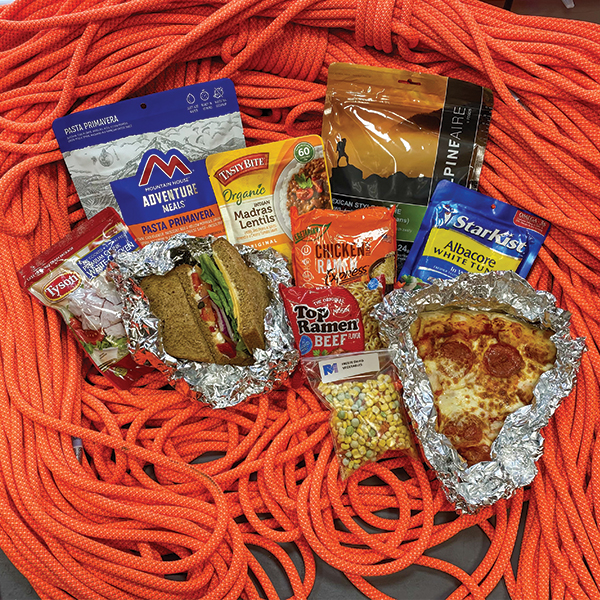
MEALS
On the Expedition Skills Seminar – Shuksan you will need 6 mountain lunches, 4 dinners, and 4 breakfasts while on the mountain.
OVERVIEW
Nutrition while training and nutrition while climbing are two very different things. You may follow a specific nutrition regimen while training to aid your desired outcomes, but once it comes to the climb, calories are what count the most. While climbing, you are trying to maximize energy and performance over a short period of time.
Our food priorities when climbing are:
- a high-calorie intake
- a variety of flavor profiles (sweet, salty, sour, etc.)
- durability/packability
- enjoyment
Caloric requirements will vary widely from climber to climber based on physical size and metabolism. It is important for you to know what your body requires. One of the normal, albeit disconcerting, adjustments to altitude is a slight loss of appetite. Bring food you enjoy. If you don't love a food at home, you certainly won't like it on the mountain!
Ample hot and cold water will be provided for your meals, drinks, and refilling water bottles. When planning your menu, don't bring any items that require extensive preparation, cooking, or simmering. We are able to provide you with boiling water but do not have the ability to actually cook food items.
Things to keep in mind as you plan your meals:
- How much space the food will take in your backpack
- How well the food will hold up throughout the trip in your backpack
- How much waste does the food produce
Consider repacking items into smaller Ziploc bags to minimize the space in your pack. Your food will get crammed into your backpack, jostled around, exposed to extreme temperatures, and even sat on (by you, of course!). What holds up better in these conditions, two slices of bread or a bagel? When packing, it is essential to consider the waste you will produce on the climb; after all, you have to carry it off the mountain. We've already mentioned repacking items to minimize space. Repacking items can also eliminate waste!
MOUNTAIN LUNCHES
Mountain lunches, aka snacks, are eaten during short breaks throughout the day. We continually snack to keep our energy levels up while we climb. We typically take rest breaks every hour or so to adjust our clothing layers, eat, and hydrate. Avoid packing any items that require preparation or hot water at each break. In terms of quantity, aim to bring 1 lb. of climbing food per day. We suggest using snack or sandwich size Ziploc bags to portion out snack food.
The importance of having foods that you genuinely enjoy cannot be overstated. Eating properly is the key to maintaining strength while in the mountains. To combat the loss of appetite at altitude, we aim to have a variety of foods that stimulate the whole palate, from sweet to sour to salty. See the sample menu and packing list below for ideas!

| • Cold pizza | • Bagel sandwich | • Tortilla wraps | • Chips |
| • Trail mix | • Peanut butter pretzels | • Chocolate covered pretzels | • Apple slices |
| • Crackers | • Cookies | • Candy bars | • Protein bars |
| • Chewy candy | • Veggies and hummus | ||
| PRO TIP: Feel fancy! Charcuterie (cured meat, cheese, and crackers) makes a great mountain lunch! |
|||
Breakfast
Single-serving instant oatmeal, Cream-of-Wheat, or granola make a good main course fare. A variety of granola bars, pastries, fruit, and a hot drink mix of coffee, tea, cocoa, or cider are suggested. Plan on eating a breakfast that tastes good and that you find filling. See the sample menu and packing list below for additional ideas!

| • Instant hot cereal (Oatmeal, Cream-of-Wheat, Cream-of-Rice, etc.) | |||
| • Granola or cereal | |||
| • Freeze-dried breakfast (Mountain House, Peak Refuel, Mountain Zora, and Katadyn's Alpine Aire all have breakfast options) | |||
| • Add-ins such as individual servings of peanut butter or honey, raisins or craisins, or a few tablespoons of powdered milk can put your mountain cereal game over the top. | |||
| PRO TIP: Think outside the box. Peanut butter and jelly sandwiches (on bagels) or ramen make great breakfast options! |
Dinner
This meal will give your body the initial fuel it needs during your summit attempt. Spend time considering your options so that you go to bed nourished and ready for the climb ahead of you. Freeze-dried entrees are very convenient mountain dinners. Pay attention to the caloric quantity – it varies from meal to meal. See the sample menu and packing list below for more ideas!
| • Freeze-dried entrée (Mountain House, Peak Refuel, Mountain Zora, and Katadyn's Alpine Aire have a wide variety of options) | |||
| • Instant soups (including Cup-o'Noodles and ramen) | |||
| • Cold pizza | |||
| • Cold fried chicken | |||
| • Pasta salad | |||
| • Bagel sandwich | |||
| PRO TIP: Have a tasting party of freeze-dried entrees to test them out before your climb. |
BEVERAGES
Staying hydrated on the climb is crucial. You will have access to ample cold water while at camp for drinking and replenishing water bottles. When climbing, you will want to ration how much water you drink at each rest break to ensure you have water throughout the entirety of your climb. You can expect breaks to occur approximately every hour or so of climbing.
Just as with food, it is important to have a variety of things to drink that excite your taste buds. Drink mixes such as Gatorade, Kool-Aid, Liquid IV, Nuun, etc., are great for flavor. Hot beverage options are also an important component to consider while at camp. Coffee, tea, cocoa, and cider are great ways to warm up in the evening before bed, when you wake up for your alpine start on summit day, and to recharge once back at camp.

| • Drink Mixes (Gatorade, Kool-Aid, Liquid IV, and Nuun are great for flavor variety) | |||
| • Instant Coffee (Starbucks Via is a great option for being pre-portioned) | |||
| • Assorted Tea | |||
| • Instant Cocoa | |||
| • Instant Cider | |||
| PRO TIP: Skip the water bladder and practice rationing your water while training. |
Payments
Deposit Payments: A non-refundable deposit payment of $500 per person secures your reservation.
- Deposit payments may be made via MasterCard, Visa, American Express*, e-check/ACH, check from a U.S. bank, or wire transfer**.
- **Wire transfers must cover all fees charged by your bank. The amount of the incoming wire to our bank must equal the balance payment amount.
Balance Payments: The balance payment is due 120 days before the start of your program.
- Balance payments may be made via MasterCard, Visa, American Express*, e-check/ACH, check from a U.S. bank or wire transfer.**
- **Wire transfers must cover all fees charged by your bank. The amount of the incoming wire to our bank must equal the balance payment amount.
- A payment reminder is emailed approximately three weeks before your payment due date. If your balance payment is not received 120 days before the start of your program, your reservation will be canceled, and all program fees will be forfeited.
- Payment in full is required when registering for a program within 120 days of the departure date.
*There is a 3% surcharge on all credit/debit card transactions. Credit/debit cards are not accepted for payments of $10,000 or more.
Cancellation
The $500 per person deposit is non-refundable and non-transferable.
- All cancellations require written notification. Once the RMI Office receives your written notification of cancellation, the following policy applies:
- If you cancel 120 or more days before the start of your program, the $500 per person deposit will not be refunded.
- If you cancel less than 120 days before the start of your program, no refunds will be issued.
Due to the time-sensitive nature of these programs, and the amount of preparation time required for this program, we strictly adhere to our policy and cannot make exceptions for any reason.
Cancellation Insurance
We highly recommend travel insurance for this trip. Please see our Travel Tab for details.
Change of Date
Date changes are subject to availability and apply only to the current climbing season. Date changes may be requested at anytime up to 90 days prior to your departure date for a $200 fee per person. No date changes allowed less than 90 days before departure.
Risk Management
Please clearly understand that mountaineering is inherently hazardous. Managing risk is RMI’s number one priority. Our guides manage significant hazards inherent in mountaineering, but they cannot eliminate them. Objective hazards include rockfall, icefall, avalanches, slides or falls by individuals and rope teams on steeper slopes, weather-related problems including cold, heat, high winds, and other unnamed dangers that can occur while climbing.
You are choosing to engage in an activity in which guided and non-guided climbers have been injured or killed. While those accidents are indeed infrequent, they may occur at any time and be out of our control. We ask that participants acknowledge the risks and hazards of mountaineering and make their own choices about whether or not to engage in this activity.
Participant Responsibilities
Mountaineering is both an individual challenge and a team endeavor. Each Participant is required to share in the responsibility of the safety and success of the team. For this reason, we ask that each Participant:
- Possess the necessary physical and mental fitness required for this program.
- Review and understand all program information.
- Update the RMI Office if there are any changes to your health or medical information before departure.
- Be properly attired and equipped as outlined in the Equipment List.
- Act in a considerate manner toward all team members.
- Help minimize our impact on the environment and follow appropriate Leave No Trace practices.
- Describe yourself, honestly and accurately, in terms of fitness, health, skills, abilities, and your equipment to your guide staff.
- Communicate with your guide staff if there are any changes in your medications or health while on your program.
- Adhere to the advice of your guide staff.
- Continue to self-assess throughout the program, evaluating your fitness, health, skills, and abilities in terms of the demands required of the program.
RMI reserves the right to dismiss the Participant from a program or to send the Participant to a lower altitude at any time if the RMI Guide Staff determines, in its sole discretion, that the Participant is not physically, technically, or psychologically prepared for, or capable of participating in the program, or for any other reason that may compromise the safety, health, or well-being of the Participant or the entire group. If this decision is made, the Participant will not receive any refunds or credits and will be financially responsible for all additional costs associated with an early departure, including but not limited to, evacuation, transportation, hotel reservations, meals, etc.
Zero Tolerance Harassment Policy
Rainier Mountaineering, Inc. (RMI) does not tolerate harassment or mistreatment of our participants or employees. Inappropriate conduct under this policy may include conduct that creates a disrespectful, intimidating, hostile, degrading, humiliating, or offensive environment for a participant or employee. Engaging in such conduct is a violation of this policy.
RMI may consider conduct to violate the policy even if it falls short of unlawful harassment under applicable law. When determining whether conduct violates this policy, we will consider whether a reasonable person could conclude that the conduct created an intimidating, hostile, degrading, or demeaning environment.
Violation of this policy may result in removal from a program, as well as refusal to provide services indefinitely. We place the utmost value on the safety of our participants and employees. Please report any incidents to RMI management.
Age requirements
All participants must be 18 years old at the time of registration.
Photo Release
RMI’s Photo Release outlines the terms and conditions for using your likeness in photographs, videos, or other digital media.
I hereby grant Rainier Mountaineering, Inc. (RMI) or its affiliates permission to use my likeness in a photograph, video, or other digital media (“photo”) in any and all of its publications, including web-based publications. By granting permission, you allow RMI to utilize these media for lawful purposes.
Here are the key points:
- Authorization: You authorize RMI to edit, alter, copy, exhibit, publish, or distribute the photos.
- Ownership: All photos become the property of RMI and will not be returned.
- Compensation: You will not be compensated for these uses.
- Rights: RMI exclusively owns all rights to the images, videos, and recordings and to any derivative works created from them.
- Waiver: You waive the right to inspect or approve printed or electronic copies.
- Release: You release Rainier Mountaineering, Inc. and its assigns and licensees from any claims arising from these uses, including defamation, invasion of privacy, rights of publicity, or copyright.
- Hold Harmless: You hold harmless, release, and forever discharge RMI or its affiliates from any and all claims, demands, and causes of action which I, my heirs, representatives, executors, administrators, or any other persons acting on my behalf or on behalf of my estate have or may have by reason of this authorization.
Summit Attempt
RMI cannot guarantee that you will reach the summit. Weather, route conditions, your own abilities, or the abilities of other climbers may create circumstances that make an ascent unsafe, and you or your entire group may have to turnaround without reaching the summit.
Failure to reach the summit due to a person’s own lack of fitness or to any of the events associated with mountaineering (such as weather, route conditions, avalanche hazard, team dynamics, etc.), are not Rainier Mountaineering, Inc.’s responsibility and will not result in a refund, credit, or reschedule.
General Policies
RMI's program schedule and itineraries are subject to change or adjustment based on a number of factors. These include, but are not limited to, route conditions, weather, group strength, terrain, other environmental factors, and many other factors. RMI has complete discretion to change plans to accommodate any of these or other factors, including but not limited to, increases in program fees, changes to program schedule or itinerary, and changes to guides or staff, as necessary for the proper and safe conduct of the program. Once the program has started, the Lead Guide will decide on any changes to the itinerary, including ending the program early if the continuation of the program may compromise the safety, health, or well-being of the group.
We reserve the right to cancel any program due to inadequate signups, weather, route conditions, or for any other reason. In such a case, we will make every effort to reschedule the Participant on a different program date. If rescheduling is not possible, we will issue the Participant a refund for all program fees paid to RMI, less any non-refundable payments made on behalf of the Participant in preparation of the program, and prior to the cancellation of the program. RMI cannot be responsible for any non-refundable expenses the Participant incurred in preparation for the program (i.e., airline tickets, hotel reservations, rental cars, equipment purchases or rentals, etc.).
Once a program begins, there are no refunds or credits for weather-related cancellations, or for a program that may end early due to weather, route conditions, or any other circumstances that may compromise the health, safety, or well-being of the group. Furthermore, if the Participant decides for any reason not to begin a program, or to discontinue a program at any time, no refunds or credits will be issued. The Participant will be responsible for all additional costs associated with an early departure, including, but not limited to, evacuation, transportation, hotel reservations, meals, etc.
The Participant is responsible for any costs incurred due to COVID-19, including but not limited to, any testing fees or costs associated with medical care and/or quarantine such as hotel accommodations, meals, separate transportation, etc.
Land Costs are provided as a package, and refunds or credits will not be issued for any unused costs.
The Participant understands and agrees that RMI assumes no responsibility or liability in connection with any travel and hospitality services provided to the Participant by other companies in connection with the program, including but not limited to, the services provided by airlines, hotels, rental cars, and transportation companies. In addition, RMI is not responsible for any act, error, omission, or any injury, loss, accident, delay, irregularity, or danger by a supplier of travel or hospitality services to the Participant in connection with the RMI program. The Participant will be responsible for all costs associated with any travel delays, missed connections, or missing baggage that requires additional arrangements (separate transportation, hotel accommodations, meals, etc.) to be made on your behalf for you or your baggage to rejoin the program.


