


Travel Consultant
RMI has partnered with Erin Rountree to provide comprehensive travel support. We have been working with Erin for many years. As an independent agent of the Travel Society, she has booked countless miles for adventure travelers across the globe and is extremely knowledgeable about the travel needs of our programs. Please call (208) 788-2870 or send email to [email protected].
Travel Insurance
We highly recommend travel insurance for this trip.
Your travel insurance policy should include trip cancellation, trip interruption, travel delay, baggage loss or delay, medical expenses, and evacuation.
Navigating through the different options for travel insurance can be challenging. When purchasing Travel Insurance, here are a few items to consider:
- Read the fine print. Travel Insurance offers reimbursement when you must cancel your trip for an eligible reason for prepaid, non-refundable trip costs that you insure. However, there are exclusions, so make sure you understand the "eligible reasons."
- Confirm that your activity is an eligible "activity." Not all travel insurance policies will offer coverage for activities such as mountaineering, climbing, skiing, or trekking adventures. Policies can also exclude coverage for activities due to the gear used (crampons, ice axe), activities that go above specific elevations, or activities in a particular region of the world. If there are exclusions, you may need to add an "Adventure" or "Sports" package to help cover your activity.
- Verify that your state of residence is allowed with the policy that you are purchasing. Not all insurance companies offer policies in all 50 states.
- Contact your travel protection company directly for any questions you have regarding benefits or coverage.
TRAVELEX
In today’s changing travel environment, it’s important to protect your travel investment. Unforeseen events such as flight delays, baggage loss or even a sudden sickness or injury could impact your travel plans. For your convenience, we offer Travelex Insurance protection plans to help protect you and your travel investment against the unexpected.

For more information on the available plans visit Travelex Insurance Services or contact Travelex Insurance (800) 228-9792 and reference location number 47-0370.
The product descriptions provided here are only brief summaries and may be changed without notice. The full coverage terms and details, including limitations and exclusions, are contained in the insurance policy. Travelex Insurance Services, Inc. CA Agency License #0D10209. Insurance coverages underwritten by individual member companies of Zurich in North America, including Zurich American Insurance Company (NAIC #16535, state of domicile: New York). RETWEB
harbor
Harbor Travel Insurance covers the following critical benefits:
- Evacuation to a nearest appropriate hospital once hospitalized.
- Trip cancellation/interruption, primary medical expense coverage, sporting goods, baggage loss, emergency dental, AD&D, and more.
- Completely integrated one-stop program with a single contact for emergency services to travel assistance and insurance claims
- 24/7 access to paramedics, nurses, and military veterans.
![]()
Harbor Travel Insurance is powered by Redpoint Resolutions, a medical and travel security risk company. Their team is comprised of special operations veterans, paramedics, Stanford Medicine affiliated physicians, former intelligence officers, insurance actuaries, and global security experts with dozens of years of experience in theaters around the world. The Redpoint network covers the globe, making them uniquely equipped to provide elite rescue travel insurance – in every sense of the word.
Getting There
Rainier BaseCamp is located in Ashford, WA, and is the home of RMI Expeditions, Whittaker Mountaineering, Whittaker's Bunkhouse, and BaseCamp Bar and Grill. Ashford is located 75 miles from the Sea-Tac Airport.
Note: Beginning May 7, 2025, every air traveler 18 years of age and older will need a REAL ID compliant driver’s license, state-issued enhanced driver’s license, or another acceptable form of ID to fly within the United States.
Most climbers traveling to Ashford will want to rent a car from the airport. This is the most convenient and reliable way to get here.
Ride Share: If you are interested in sharing a ride, please go to your RMI Account, then to "Discussion Board" and "Ride Share" to post your information.
Seattle Airport Car Service
Phone: 206-375-4000
Email: [email protected]
ENTRY INTO MT. RAINIER NATIONAL PARK
All our Mt. Rainier programs begin at Rainier BaseCamp in Ashford. All Mt. Rainier climbs, seminars and schools include transportation for our climbers from Rainier BaseCamp to Paradise or to the White River Entrance.
Ashford Area Accommodations
| The Hideaway Tiny House | n/a |
| The Overlook | n/a |
| Whittaker's Motel and Historic Bunkhouse | (360) 569-2439 |
| Nisqually Lodge | (360) 569-8804 |
| Alexander's Lodge | (360) 569-2300 |
| Wellspring Spa & Cabins | (360) 569-2514 |
| Guest Services Inc: (Paradise Inn and National Park Inn) | (360) 569-2275 |
| Mt. Rainier Visitor Association | (360) 569-0910 |
| Camping | n/a |
| You may also go to VisitRainier.com to search for accommodations in the Ashford area. | |
Weather
For updated Mt. Rainier weather forecasts, click here.
Please click on the links below to see the Mt. Rainier webcams:
- Paradise view towards Mount Rainier
- Paradise view - East
- Paradise view - West
- Paradise view towards the Tatoosh Range
- Longmire view
- Air Quality Camera
Tipping
Our guides put considerable effort into ensuring your safety and success on the mountain. If you had a positive experience, leaving a gratuity is a wonderful gesture to show your appreciation. The amount is up to you and should reflect how much you enjoyed the service. Typically, tips for excellent service range from 10% to 15% of the program cost. Guides can accept gratuities in cash, Venmo, or by check. If you prefer, you can also pay tips using a credit card through the RMI Office.
Facts
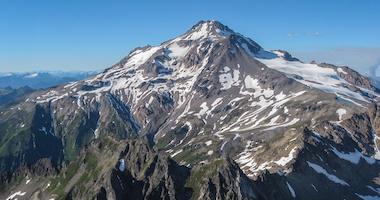
Mt Rainier became the nation's fifth National Park in 1899, some twenty-nine years after it was first climbed. Mt. Rainier National Park encompasses 235,625 acres and is 97% wilderness and 3% National Historic Landmark District. At 14,410', Mt. Rainier is the most prominent peak in the Cascade Range. It is a dormant volcano that last erupted approximately 150 years ago.
Guided mountaineering activity has taken place since the late 1800s, and The Mountain is still considered a prime training ground for climbing in Alaska, South America, and the Himalayas. With more than 20 active glaciers encompassing some 36 square miles of ice, Rainier boasts the largest ice cover of any peak in the lower 48 United States. Its weather can be deceptively gentle or as fierce as encountered on any high mountain anywhere in the world. There is a wealth of information on the Mt. Rainier National Park website. We encourage you to enhance your enjoyment of the climb with some fun facts about the Park and the history of climbing there.
Resources
General Information on Mt. Rainier National Park (MRNP) - www.nps.gov/mora
The Mountaineers Book - www.mountaineersbooks.org
Gateway Communities & Activities outside Mt. Rainier National Park - www.visitrainier.com
Recommended Reading
The Challenge of Rainier, by Dee Molenaar
Mt. Rainier - A Climbing Guide, by Mike Gauthier
Mt. Rainier: The Story Behind the Scenery, by Ray Snow
National Geographic Trails Illustrated MRNP topo map
Qualifications
This trip is open to all individuals in excellent physical condition. There are no technical climbing prerequisites to join this program.
Get In The Best Shape Of Your Life And Then Go Climb A Mountain

contact our partners at alpine training systems to purchase a Mt. rainier traning plan. for more information on fitness and training, click here.
Physical Fitness Training
Mountaineering requires a high degree of physical stamina and mental toughness. Even for the healthiest and fittest individuals, climbing mountains qualifies as an extremely challenging endeavor.
- Start immediately. Start a rigorous fitness and training program now with the goal of arriving in top physical condition and confident in your skills.
- Be intentional. Focus on gaining the necessary strength, stamina and skills to meet the physical and technical demands of the climb.
- Be sport-specific. The best fitness and training program mimics the physical and technical demands of your climbing objective. The closer you get to your program date, the more your training should resemble the climbing.
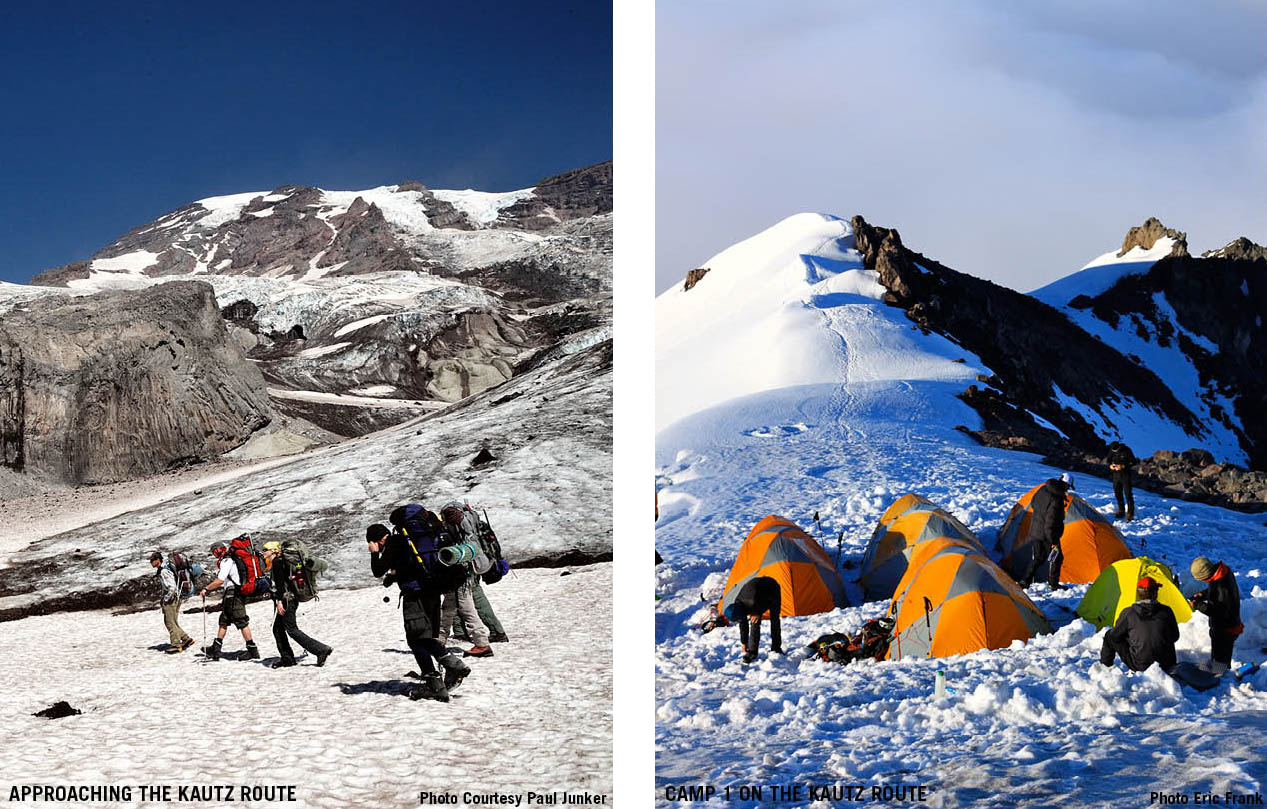
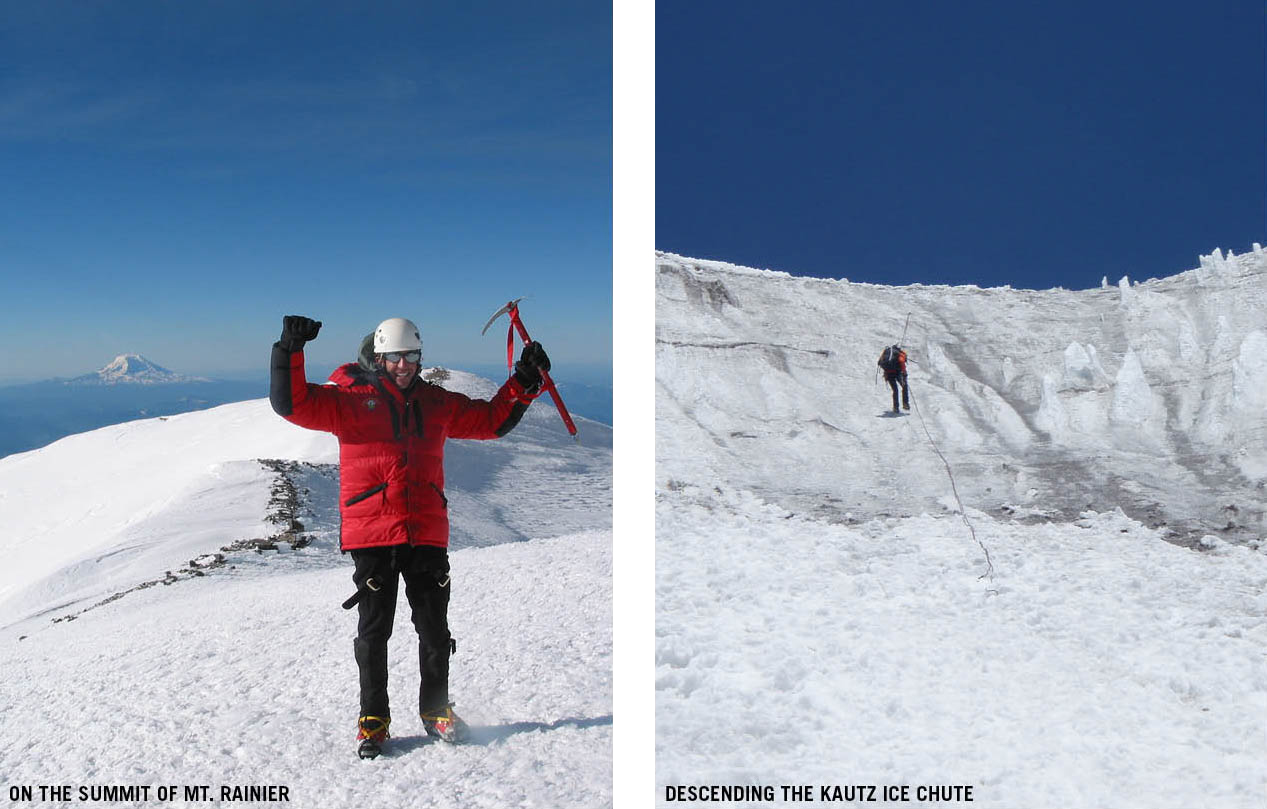
For the Expedition Skills Seminar - Kautz, you are preparing for:
- Steep hiking, climbing and glacier travel with a 50-60 lb load (Your personal clothing, gear, food and a portion of group equipment)
- A 12+ hour summit day
- Mountaineering techniques requiring core strength and flexibility
Nothing ensures a personally successful adventure like your level of fitness and training. Bottom line: Plan on being in the best shape of your life and ready for a very challenging adventure!
Below are approximate outlines of the program's physical demands that will be helpful in planning your training schedule and goals:
|
Total Hiking Time
|
Elevation Gain / Loss
|
Total Distance
|
Pack Weight
|
| DAY 1 | |||
|
n/a
|
n/a
|
n/a
|
n/a
|
| DAY 2 | |||
|
2 - 2 ½ Hours
Round Trip |
Gain = 1000'
Loss = 1000' |
4 Miles
Round Trip |
20 - 25 lbs
|
| DAY 3 | |||
|
3 hours
|
Gain = 1,000' - 2,500'
Loss = 500'
|
1.5 - 2 Miles
|
50 - 60 lbs
|
| DAY 4 | |||
|
4 - 5 Hours
|
Gain = 2,500' - 4,500'
|
1 - 1.5 Miles
|
50 - 60 lbs
|
| DAY 5 | |||
|
12 + Hours
Round Trip |
Gain = 4,000'
Loss = 4,000' |
8 Miles
Round Trip |
20 - 25 lbs
|
| DAY 6 | |||
|
3 - 4 Hours
|
Loss = 5,000'
|
3 Miles
|
50 - 60 lbs
|
Please refer to our Resources for Mountaineering Fitness and Training for detailed fitness and training information.
Acclimatization
Excellent physical conditioning significantly increases your ability to acclimatize. Climbers in excellent physical condition simply have more energy to commit to the acclimatization process throughout the days and nights of the ascent, allowing their bodies to adjust to the altitude more easily.
While the key to climbing high is proper acclimatization, this climb effectively moves up and down the mountain at a rate that exceeds our body’s ability to adjust (acclimate) to the high altitude. This is true whether a program spends 2 days or 5 days on the upper mountain (elevations above 10,000 feet). During our short climb, our bodies simply do not have the time to completely adjust to the altitude, and because of this short stay, our bodies do not typically succumb to altitude’s ill effects. In short, climbers generally experience the mild but uncomfortable, yet normal, symptoms of their bodies beginning the adjustment process. While climbers will feel better rested on the slightly longer programs, fitness remains the key factor in a climber’s performance.
In addition, physical performance at altitude is often related to how well you have taken care of yourself throughout the hours, days and weeks prior to summit day. Arriving healthy and well-rested, maintaining proper hydration and caloric intake, and protecting against unnecessary heat loss (staying warm) are usually key factors in an individual’s success on a short-term visit to altitude.
What You Need to know
A list of required personal equipment accompanies every RMI program, and the thought processes behind each item are much greater than simply “preparing for the worst and hoping for the best.” The list for your program considers factors such as seasonality, route conditions, weather, elevation, and more. As such, this list is framed within the broadest of contexts and is dynamic by its very nature.
Please follow this equipment list closely so that you will arrive for the gear check with all the required items. If you own the item, or have something you think is similar, bring it with you. If the guide feels it is inadequate, you can rent or purchase the necessary piece from Whittaker Mountaineering.
The guides’ recommendation on whether to bring along or leave behind specific item(s) comes during the gear check when the team first meets. If a guide deviates from the list, it is for a good reason. Their recommendation may be related to the weather, route conditions, freezing level, etc. Occasionally this recommendation comes at the expense of having previously purchased an item that may not be needed or the need to buy or rent an additional item.
Ultimately, there will never be a consensus for a “perfect” equipment list for any mountain. It does not exist because of the many variables climbers face throughout the climb. Fine-tuning will occur once you meet with your guides and continue throughout the program.
-
 Most of the required equipment is available for rent or purchase from our affiliate Whittaker Mountaineering. RMI climbers receive a 10% discount on new clothing and equipment items ordered from Whittaker Mountaineering.
Shop Your Equipment List // Rent new equipment for your climb
Equipment List
GUIDE PICK
Guide Pick™ is a collaboration between RMI Expeditions and Whittaker Mountaineering. At the end of each season, Whittaker Mountaineering surveys RMI's guides to determine the best mountaineering gear and apparel. They compile the results, reach a consensus, and award the best in each category with a Guide Pick™ label.
This exact item does not need to be purchased or used; however, any item you choose must have characteristics and performance abilities similar to those of the Guide Pick.
Pack & Travel

Your pack must be large enough for your layers, climbing gear, and food, as well as a portion of your tent and your share of group equipment. The pack volume you choose depends on your experience and the quality of your gear; if you opt for a smaller pack, practice packing and make sure you can fit all of your gear with room to spare. You will not need a separate summit pack.
Sleeping Bag & Pad

We recommend a bag rated between 20° and 0° F. Allow ample room for movement. We recommend down over synthetic for its light weight, warmth, and packability. If climbing in April, May, June, or September, or if you know you sleep cold, consider a 0° F bag.


A full-length inflatable pad.

A full-length closed cell foam pad, used in combination with the inflatable sleeping pad.
Technical Gear


A 50 - 55 cm hybrid ice axe with hammer for steep terrain.

We recommend a comfortable, adjustable alpine climbing harness. Removable, drop seat, or adjustable leg loops are convenient for managing your clothing layers over the course of the climb and facilitate going to the bathroom. If you rent a harness, a triple-action carabiner is included.

Used for clipping into the climbing rope. Harness rentals include this carabiner.

Used for clipping into anchors, etc.


10-point or 12-point adjustable steel crampons with anti-balling plates designed for general mountaineering use.
Transceivers are worn on the upper mountain during your summit attempt. If you rent a transceiver fresh batteries will be provided.

We recommend lightweight and collapsible poles with snow baskets.
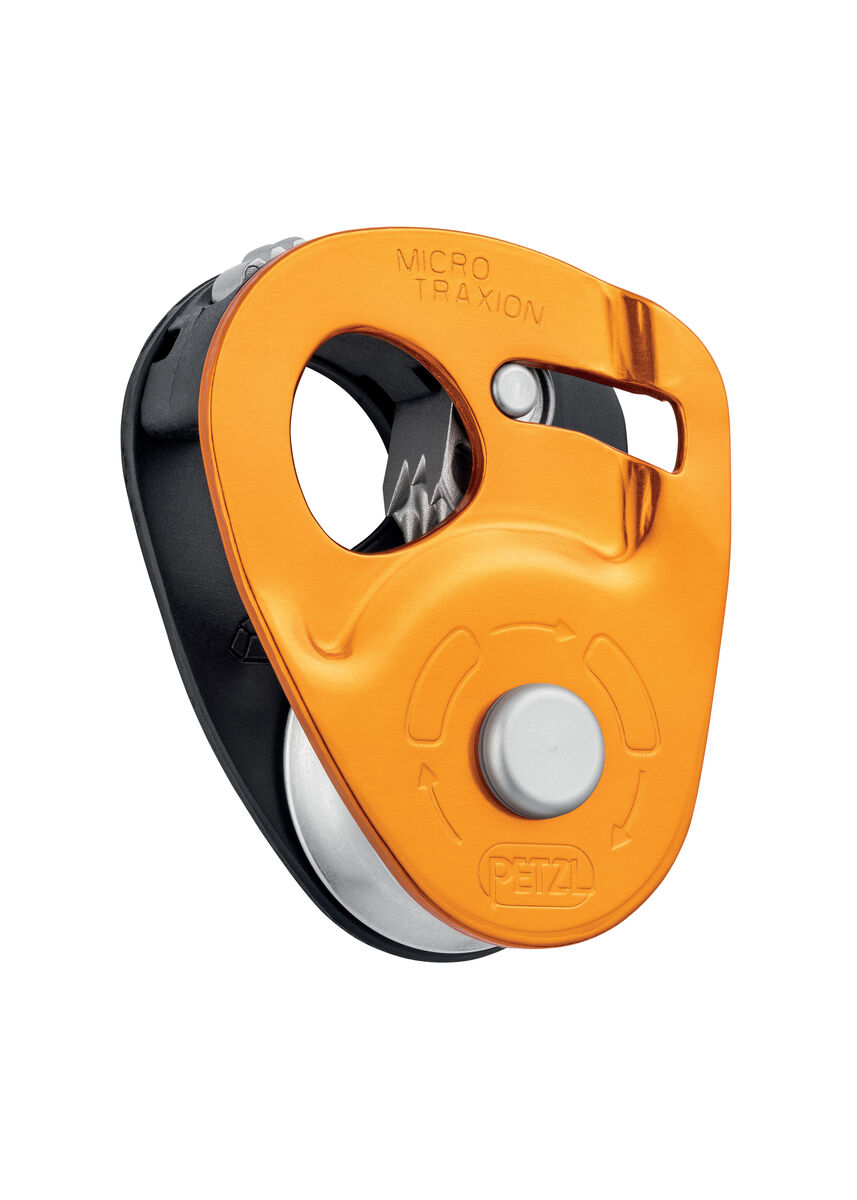
A Progress Capture device designed for Crevasse Rescue, Hauling and Self- Rescue. While not mandatory this device increases efficiency while hauling and while setting up our rope systems.

A tube-style belay/rappel device that can accept a variety of rope diameters.
Premade sewn loops are used for friction hitches on climbs and rescue. Neat, efficient and quick to store. Most guides prefer these premade options for their ease and utility.

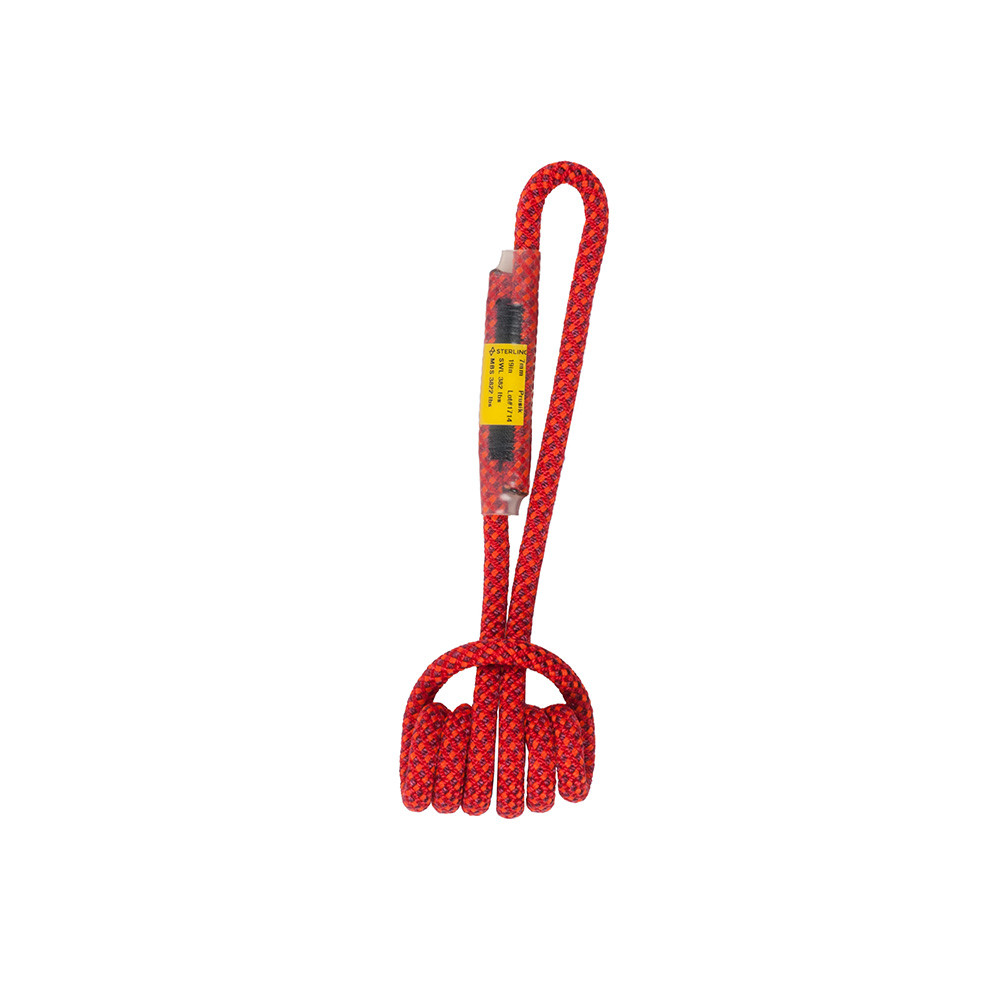
6 mm cordelette in one continuous length OR precut into two 4' sections OR two 13.5" Sterling Hollow Block sewn loops.
7 mm cordelette in one continuous length OR one 240cm dyneema sling.
Head

A UIAA (Union Internationale des Associations d’Alpinisme) or CE (European Committee for Standardization) certified climbing helmet.

Wool or synthetic. It should provide warmth but also be thin enough to fit underneath a climbing helmet.
A hat without a button on top will fit better and be more comfortable under a helmet.

A Buff provides versatile head and neck protection. A neck gaiter is also acceptable.

Start with fresh batteries and bring extra set(s) of batteries appropriate to the duration of the trip.

Glacier glasses are protective sunglasses that provide close to 100% frame coverage (wrap-around frames and side shields ensure no light can enter from the top, bottom, and sides of the glasses) and transmit less than 10% of visual light.

Amber or rose-tinted goggles for adverse weather. On windy days, climbers, especially contact lens wearers, may find photochromatic lenses the most versatile in a variety of light conditions.
Hands
Each glove layer is worn separately as conditions change during the climb.

Light weight liner or softshell gloves. Lighter colors absorb less sunlight while still offering UV protection.

Wind- and water-resistant, insulated mountain gloves.

Wind- and water-resistant, insulated gloves or mittens. These also serve as emergency backups if you drop or lose a lighter-weight glove.
Upper Body
We recommend a minimum of five upper body layers, all of which can be used in conjunction with each other. Two of these should be insulating layers, one light, and one medium, that fit well together. Today there are many different layering systems to choose from, including fleece, softshell, down, and synthetic options.

Long-sleeve wool or synthetic top. Light weight, light-colored, hooded baselayers (sun hoodys) are highly recommended for sun protection.

One step up in warmth and bulk from a baselayer. A technical fleece makes an ideal light weight insulating layer.

A down, synthetic, or softshell hoody makes a great midlayer.

An uninsulated, waterproof shell jacket with hood.

Your expedition-style heavy parka must extend below the waist, have an insulated hood, and be able to fit over the rest of your upper body layers. While the parka is worn primarily at rest breaks on summit day, it also serves as an emergency garment if needed. We recommend down rather than synthetic fill.

We recommend a moisture-wicking, active-wear bra.
Lower Body
We recommend a system of four layers, all of which can be used in conjunction with each other. Products which combine several layers into one garment, such as traditional ski pants, don’t work well as they don’t offer the versatility of a layering system.

Non-cotton briefs or boxers.

Synthetic or wool.

Softshell climbing pants can be worn in combination with a base layer on colder days, or alone on warmer days.

Non-insulated, waterproof shell pants must be able to fit comfortable over your baselayer bottoms and softshell climbing pants. Full side zippers or 7/8 side zippers are required so that shell pants can be put on while wearing boots and crampons.

A light weight, synthetic pair of pants is a good option for the approach trek when hiking at lower altitudes and in warm conditions. These pants have no insulation, are typically made of thin nylon, and commonly feature zippers to convert between pants and shorts.
Feet
Boots are one of the most important pieces of mountaineering gear, and bringing the right pair is critical to your safety and success on Mt. Rainier. You will need one pair of boots for this climb, and the type of boot you wear will be dictated by freezing level. If the freezing level is below 10,000 feet, your guide will require the use of double boots. If the freezing level is above 10,000 feet, you may use either single or double boots. We consistently see freezing levels below 10,000 feet in April, May, June, and September, though periods of cold weather are not uncommon in July and August.
If this is your first time climbing, we highly recommend renting boots from our partner company Whittaker Mountaineering. Mountaineering boots do not break in like normal footwear so there is not much advantage in buying them unless you want to see how they feel on your feet before the climb or plan on doing more mountaineering in the future. If you rent, you can switch between single and double boots the day of your climb.

SINGLE BOOTS: Insulated, full-shank, and crampon-compatible leather or synthetic boots designed for mountaineering. Single boots tend to be lighter and more comfortable than double boots at the expense of warmth.

DOUBLE BOOTS: Insulated double boots designed for mountaineering. Plastic-shelled models are acceptable, though modern synthetic models are lighter and more comfortable.

A pair of approach shoes or lightweight boots for approaches and hiking on rugged terrain after the snow melts (typically by mid-July). Can also be used as a camp shoe.

A knee-length pair of gaiters, large enough to fit over your mountaineering boots. This will protect you from catching your crampon spikes on loose clothing. Not needed if using a boot with an integrated gaiter.

Either wool or synthetic. Whatever sock combination you are accustomed to wearing during your training or previous adventures (whether single medium weight socks, a medium weight with a liner sock, two medium weight socks together, etc.), should work just fine for this climb.
First Aid & Medications

Our guides carry comprehensive medical kits, so keep yours small and light. We recommend a selection of adhesive bandages, antibiotic ointment, Moleskin and blister care, medical tape and/or duct tape, basic pain reliever, and personal medications.
Personal Items
-450x0.jpg)
You are responsible for providing your own meals and snack food in town and while on Mt. Rainier. See the Food tab for suggestions and quantities.

Packable plastic bowl. Collapsable models can work but must be handled carefully to avoid unintended collapsing. A lid is a great feature.

Insulated outdoor-style mug. We recommend a model with a removable lid, which helps retain heat and prevent spills. You may also choose to use 0.5L insulated bottle or a 0.5L Nalgene.

A spoon or spork made of durable plastic or anodized metal. A long-handled spoon can be nice, especially if eating from a freeze-dried meal pouch.

One-liter water bottles with wide mouths made of co-polyester (BPA-free plastic). No hydration systems as they tend to freeze on the upper mountain and be hard to fill. Cold water for drinking is provided.


Heavy-duty trash compacter bags for use as waterproof pack/stuff sack liners. You can also use a waterproof pack liner.

Include toilet paper, hand sanitizer, toothbrush and toothpaste, and wet wipes. Bring a quantity appropriate to the duration of your trip.

We recommend small tubes of SPF 30 or higher, which can be carried in pockets for easy access and to prevent freezing.


Spare prescription glasses if you wear contact lenses/eyeglasses.

Practice using this before coming on the climb!

One clearly-marked wide-mouth or collapsible bottle for overnight use.

Many smartphones have excellent cameras. Action cameras, small point-and-shoots, and compact dSLRs are lightweight and work well at altitude.

A small power bank, enough to charge a phone or e-reader several times.
Travel Clothes

We recommend bringing a selection of clothing to wear while traveling, sightseeing and dining.
Pre-Trip Checklist
Purchase travel insurance.
Arrange lodging in Ashford.
Reserve rental equipment.
Arrange transportation to Ashford.
Be in the best shape of your life!
Provided Equipment
RMI provides the following equipment for your program: tents, group cooking gear, shovels, climbing ropes, and blue bags (for solid waste disposal).
Every guide on your climb will carry rescue equipment and a first aid kit. Each climb has two-way radios and a cell phone for emergency contact.
MEALS
On the Expedition Skills Seminar - Kautz you will need five days of climbing food, including five mountain lunches, three dinners, and three breakfasts while on the mountain.
Don't want to plan out your food for your RMI climb? Whittaker Mountaineering has optimized Meal Packages that include everything you need for your Rainier summit attempt.
Mountain Meal Packages
OVERVIEW
Nutrition while training and nutrition while climbing are two very different things. You may follow a pretty specific nutrition regimen while you are training to aid your desired outcomes, but once it comes to the climb, calories are what count the most. While climbing, you are trying to maximize energy and performance over a short period of time.
Our food priorities when climbing are:
- a high-calorie intake
- a variety of flavor profiles (sweet, salty, sour, etc.)
- durability/packability
- enjoyment
Caloric requirements will vary widely from climber to climber based on physical size and metabolism. It is important for you to know what your body requires. One of the normal, albeit disconcerting, adjustments to altitude is a slight loss of appetite. Bring food you enjoy. If you don't love a food at home, you certainly won't like it on the mountain!
At camp, hot and cold water will be provided for your meals, drinks, and refilling water bottles. When planning your menu, don't bring any items that require extensive preparation, cooking, or simmering. We are able to provide you with boiling water but do not have the ability to actually cook food items.
Things to keep in mind as you plan your meals:
- How much space the food will take in your backpack
- How well the food will hold up throughout the trip in your backpack
- How much waste does the food produce
Consider repacking items into smaller Ziploc bags to minimize the space in your pack. Your food will get crammed into your backpack, jostled around, exposed to extreme temperatures, and even sat on (by you, of course!). What holds up better in these conditions, two slices of bread or a bagel? When packing, it is essential to consider the waste you will produce on the climb; after all, you have to carry it off the mountain. We've already mentioned repacking items to minimize space. Repacking items can also eliminate waste!
MOUNTAIN LUNCHES
Mountain lunches, aka snacks, are eaten during short breaks throughout the day. We continually snack to keep our energy levels up while we climb. We typically take rest breaks every hour or so to adjust our clothing layers, eat, and hydrate. Avoid packing any items that require preparation or hot water at each break. In terms of quantity, aim to bring 1 lb. of climbing food per day. We suggest using snack or sandwich size Ziploc bags to portion out snack food.
The importance of having foods that you genuinely enjoy cannot be overstated. Eating properly is the key to maintaining strength while in the mountains. To combat the loss of appetite at altitude, we aim to have a variety of foods that stimulate the whole palate, from sweet to sour to salty. See the sample menu and packing list below for ideas!

| • Cold pizza | • Bagel sandwich | • Tortilla wraps | • Chips |
| • Trail mix | • Peanut butter pretzels | • Chocolate covered pretzels | • Apple slices |
| • Crackers | • Cookies | • Candy bars | • Protein bars |
| • Chewy candy | • Veggies and hummus | ||
| PRO TIP: Feel fancy! Charcuterie (cured meat, cheese, and crackers) makes a great mountain lunch! |
|||
Breakfast
Single-serving instant oatmeal, Cream-of-Wheat, or granola make a good main course fare. A variety of granola bars, pastries, fruit, and a hot drink mix of coffee, tea, cocoa, or cider are suggested. Plan on eating a breakfast that tastes good, and you find filling. See the sample menu and packing list below for additional ideas!

| • Instant hot cereal (Oatmeal, Cream-of-Wheat, Cream-of-Rice, etc.) | |||
| • Granola or cereal | |||
| • Freeze-dried breakfast (Mountain House, Peak Refuel, Mountain Zora, and Katadyn's Alpine Aire all have breakfast options) | |||
| • Add-ins such as individual servings of peanut butter or honey, raisins or craisins, or a few tablespoons of powdered milk can put your mountain cereal game over the top. | |||
| PRO TIP: Think outside the box. Peanut butter and jelly sandwiches (on bagels) or ramen make great breakfast options! |
Dinner
This meal will give your body the initial fuel it needs during your summit attempt. Spend time considering your options so that you go to bed nourished and ready for the climb ahead of you. Freeze-dried entrees are very convenient mountain dinners. Pay attention to the caloric quantity – it varies from meal to meal. See the sample menu and packing list below for more ideas!
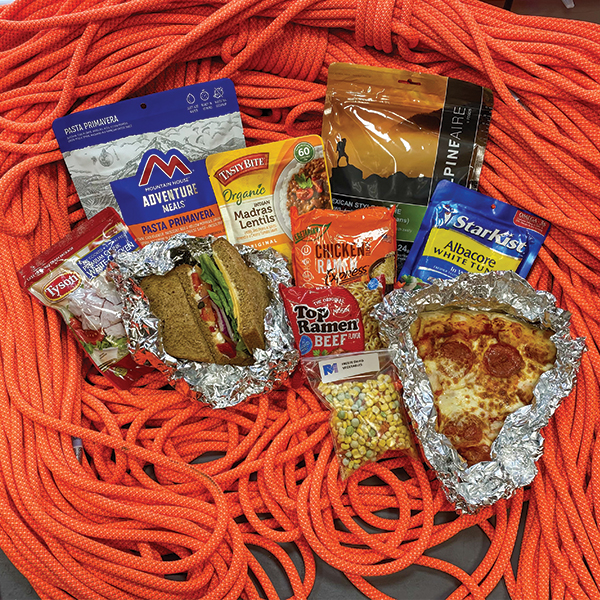
| • Freeze-dried entrée (Mountain House, Peak Refuel, Mountain Zora, and Katadyn's Alpine Aire have a wide variety of options) | |||
| • Instant soups (including Cup-o'Noodles and ramen) | |||
| • Cold pizza | |||
| • Cold fried chicken | |||
| • Pasta salad | |||
| • Bagel sandwich | |||
| PRO TIP: Have a tasting party of freeze-dried entrees to test them out before your climb. |
BEVERAGES
Staying hydrated on the climb is crucial. You will have access to ample cold water while at camp for drinking and replenishing water bottles. When you are climbing, you will want to ration how much water you drink at each rest break to ensure you have water throughout the entirety of your climb. You can expect breaks to occur approximately every hour or so of climbing.
Just as with food, it is important to have a variety of things to drink that excite your taste buds. You may love water, but it may not sound good at 10,000'! Drink mixes such as Gatorade, Kool-Aid, Liquid IV, Nuun, etc., are great for flavor. Hot beverage options are also an important component to consider while at camp. Coffee, tea, cocoa, and cider are great ways to warm up in the evening before bed, when you wake up for your alpine start on summit day, and to recharge once back at camp.

| • Drink Mixes (Gatorade, Kool-Aid, Liquid IV, and Nuun are great for flavor variety) | |||
| • Instant Coffee (Starbucks Via is a great option for being pre-portioned) | |||
| • Assorted Tea | |||
| • Instant Cocoa | |||
| • Instant Cider | |||
| PRO TIP: Skip the water bladder and practice rationing your water while training. |
|||

SAMPLE MENU
This is an example of what someone may eat for each meal on the Expedition Skills Seminar - Kautz. Use this to guide and inspire your own meal planning.
| DAY 1 — TECHNICAL TRAINING DAY | NO MOUNTAIN MEALS NEEDED | |||
| DAY 2 — MOUNTAINEERING DAY SCHOOL | 1 MOUNTAIN LUNCH | |||
| • Bagel sandwich with salami, cheese slices, and mustard | • Apple slices | • Oreos | • Protein bar |
| DAY 3 — APPROACH TO THE KAUTZ | 1 MOUNTAIN LUNCH, 1 DINNER | |||
| Lunch, in several parts | |||
| • Salami, cheese, crackers | • Hummus and crackers | • Peanut butter pretzels | • Goldfish |
| • Sour Patch kids | • Trail mix | • Candy bar | • Chips |
| Dinner | |||
| • Mountain House beef stroganoff | • Veggies and hummus | • Hot cocoa | |
| DAY 4 — CLIMB TO HIGH CAMP | 1 BREAKFAST, 1 MOUNTAIN LUNCH, 1 DINNER | |||
| Breakfast | |||
| • Instant oatmeal with one packet of honey, one packet of peanut butter, and some raisins | |||
| • Coffee | |||
| Lunch, in several parts | |||
| • Salami, cheese, crackers, or bagel (sandwich) | • Hummus and crackers | • Peanut butter pretzels | • Goldfish |
| • Sour Patch kids | • Trail mix | • Candy bar | • Apple slices |
| • Protein bar | • Chips | ||
| Dinner | |||
| • Peak Refuel Chicken Coconut Curry | • Veggies and hummus | • Hot tea | |
| DAY 5 — SUMMIT DAY | 1 BREAKFAST, 1 MOUNTAIN LUNCH, 1 DINNER | |||
| Breakfast | |||
| • Instant oatmeal | • Coffee | ||
| Lunch, in several parts | |||
| • Salami, cheese, crackers, or bagel (sandwich) | • Energy gel or chews | • Reese's Peanut Butter Cups | • Cliff Bar |
| • Protein bar | • M&Ms | • Peanut butter crackers or pretzels | • Granola bar |
| • Candy bar | • Small cookies | ||
| Dinner | |||
| • Wild Zora Baja Citrus Lentil Quinoa meal | • Veggies and hummus | • Hot tea | |
| DAY 6 — DESCENT | 1 BREAKFAST, 1 MOUNTAIN LUNCH | |||
| Breakfast | |||
| • Instant oatmeal | • Coffee | ||
| Lunch | |||
| • Salami, cheese, crackers, or bagel (sandwich) | • Peanut butter pretzels | • Candy bar | • Goldfish |
| • Sour Patch kids | • Trail mix | • Hummus and crackers | • Protein bar |
| • Chips | • Apple slices | ||
SAMPLE PACKING LIST
This is an example of quantities when thinking about packing the food listed in our Sample Menu. While it is important to keep in mind space and weight, it is also important to pack enough food. When in doubt, err on the side of packing more food. Better to take food off the mountain with you than to go hungry. Besides, you can always share or trade food with your teammates! Use this packing list as a guide for your own meal packing, so you won't forget anything (a salami sandwich without mustard is a sad sandwich).
- Ziploc bags (sandwich size) for portioning food
- Bagels (4 – 5)
- Salami, pre-sliced (2 packages)
- Cheese, pre-sliced (2 packages)
- Oreos or other cookies* (3 – 4 lunch-size packs)
- Chips (4 small lunch-sized bags)
- Apple slices (3 apple)
- Peanut butter pretzels or crackers* (enough to portion into 4 Ziplocs)
- Candy Bars (4 – 5 assorted), ones with nuts/peanut butter and chocolate are great for combining quick energy and lasting energy
- Goldfish* (enough to portion into 4 Ziplocs)
- Chewy candy such as Starbursts or Sour Patch Kids (3 – 4 packages)
- Trail mix* (enough to portion into 4 Ziplocs), Target and Trader Joe's have excellent trail mix options
- M & Ms (3 – 4 bags), great for snacking or for adjusting the chocolate to nut ratio in your trail mix
- Crackers* (enough to portion into 3 – 5 Ziplocs)
- Hummus (4 individual packets)
- Freeze-dried dinner entrées (3)
- Veggies such as carrots and celery* (enough for 3 Ziploc)
- Instant oatmeal (6 packets)
- Energy Gels or Chews (8 – 9 total)
- Granola and/or Protein Bars (4 – 5 bars)
- Hot Cocoa (3 – 4 packets)
- Tea (3 – 4 packets)
- Instant Coffee (3 – 4 packets)
- Nuun (4 – 5 packets or tablets)
-
Condiments
- Mustard (3 – 5 individual packets)
- Mayo (3 – 5 individual packets)
- Honey (3 packets)
- Peanut butter (3 pouches)
- Raisins (3 kids lunch size box)
- Sugar, as needed for your coffee/tea
- Instant creamer, as needed for your coffee/tea
*Portion these items into Ziploc bags for snacks. This will allow you to pull them out easily during our rest breaks to refuel your body.
| PRO TIP: Package your sandwiches without the condiments into a Ziploc bag. Add the condiments (in their individual packets to the bag). When its time to eat, pull out the one bag, top your sandwich with the condiments and enjoy! |
|||

GUIDE PICKS
RMI Guides climb A LOT. They've eaten a lot of food in the mountains, and they know what food they absolutely LOVE and what to leave behind. Here are some of their favorite foods to pack:
James Bealer
“I don’t go on a climb without packing lots of Oreos!”
Pete Van Deventer
“I am a big fan of baguette sandwiches. Prosciutto, brie or a good hard cheese, slices of cucumber, and a touch of butter on the bread!”
Dominic Cifelli
“Anything fresh, pizza, a sub, some fruit, etc. That’s how I stay on top of my game in the mountains.” OR “Anything I’d crave on my couch at home. Chips, chocolate, and cheese. If I wouldn’t eat it at home I probably wouldn’t want it at altitude!”
Jackson Breen
"I like to have something salty and savory to compliment the sweeter options. My go to is left over nachos wrapped in tin foil. Make sure you leave the sauce out or you'll have a soggy mess on your hands!"
BEN LUEDTKE
"I bring a twinkie with me on every climb to the summit. And I never forget my baby Nalgene with coffee for the first portion of the climb!"
Dustin Wittmier
“Caffeinated Nuun tablets! They make water more palatable and I prefer the caffeinated variety for a boost in the middle of the night.”
Payments
Deposit Payments: A non-refundable deposit of $550 per person is required to secure your reservation.
- Deposits can be paid using MasterCard*, Visa*, American Express*, e-check/ACH, U.S. bank check, or wire transfer**.
Balance Payments: The remaining balance is due 120 days before your program's start date.
- Balance payments can be made via MasterCard*, Visa*, American Express*, e-check/ACH, U.S. bank check, or wire transfer**.
- You will receive a payment reminder approximately three weeks before your payment is due. If your balance is not paid 120 days before the program starts, your reservation will be canceled, and all fees will be forfeited.A payment reminder is emailed approximately three weeks before your payment due date. If your balance payment is not received 120 days before the start of your program, your reservation will be canceled, and all program fees will be forfeited.
- Full payment is required when registering within 120 days of the program start date.
*Note: A 3% surcharge applies to all credit/debit card transactions.
**Wire transfers must include all fees charged by your bank. The amount received by our bank must match the deposit amount.
Cancellation
The $550 deposit is non-refundable and non-transferable.
- Cancellations must be submitted in writing. Once received, the following policy applies:
- Cancellations made 120 or more days before the program start date will forfeit the $550 deposit.
- Cancellations made less than 120 days before the program start date will not receive refunds or credits.
We do not offer refunds. Please remember this before registering for this program. Due to the time-sensitive nature of this program, no exceptions will be made to the cancellation policy.
Cancellation Insurance
We highly recommend travel insurance for this trip. Please see our Travel Tab for details.
Change of Date
Date changes are subject to availability and can only be applied to the current climbing season. Changes must be requested at least 90 days before the departure date and will incur a $200 fee per person. No date changes are allowed within 90 days of departure.
Risk Management
Please clearly understand that mountaineering is inherently a hazardous sport. Managing risk is RMI’s number one priority. Our guides manage significant hazards inherent in mountaineering, but they cannot eliminate them. Objective hazards include rockfall, icefall, avalanches, slides or falls by individuals and rope teams on steeper slopes, weather-related problems including cold, heat, high winds, and other unnamed dangers that can occur while climbing.
You are choosing to engage in an activity in which guided and non-guided climbers have been injured and killed. While those accidents are indeed infrequent, they may occur at any time and be out of our control. We ask that participants acknowledge the risk and hazards of mountaineering and make their own choices about whether or not to engage in this activity.
Summit Attempt
RMI cannot guarantee that you will reach the summit. Weather, route conditions, your own abilities, or the abilities of other climbers may create circumstances that make an ascent unsafe, and you or your entire group may have to turn around without reaching the summit.
Failure to reach the summit due to a person’s own lack of fitness or to any of the events associated with mountaineering (such as weather, route conditions, avalanche hazard, team dynamics, etc.) are not Rainier Mountaineering, Inc.’s responsibility and will not result in a refund, credit, or reschedule.
Participant Responsibilities
Mountaineering is both an individual challenge and a team effort. Each participant shares responsibility for the safety and success of the group. Therefore, we ask that each participant:
- Be physically and mentally fit for the program.
- Review and understand all provided program information.
- Notify the RMI Office of any changes to your health or medical information before departure.
- Be properly attired and equipped according to the Equipment List.
- Act considerately towards all team members.
- Minimize environmental impact by following Leave No Trace practices.
- Honestly and accurately describe your fitness, health, skills, abilities, and equipment to the guide staff.
- Communicate any changes in medications or health to the guide staff during the program.
- Follow the advice of your guide staff.
- Continuously assess your fitness, health, skills, and abilities in relation to the program’s demands.
RMI reserves the right to remove a participant from the program or to send them to a lower altitude if the guide staff determines, at their discretion, that the participant is not adequately prepared or capable of participating safely. This decision may be based on physical, technical, or psychological factors, or any other reason that might affect the safety, health, or well-being of the participant or the group. If removed, the participant will not receive refunds or credits and will be responsible for all additional costs associated with early departure, including evacuation, transportation, hotel reservations, and meals.
Zero Tolerance Harassment Policy
RMI has a strict zero-tolerance policy for harassment or mistreatment of our participants or employees. Inappropriate behavior under this policy includes any conduct that creates a disrespectful, intimidating, hostile, degrading, humiliating, or offensive environment for others. Such behavior is considered a violation of this policy.
RMI may consider behavior to be in violation of this policy even if it does not meet the legal definition of harassment. When assessing whether conduct violates this policy, we will evaluate whether a reasonable person would perceive the behavior as creating an intimidating, hostile, degrading, or demeaning environment.
Violations of this policy may lead to removal from a program and denial of services indefinitely. We prioritize the safety and well-being of our participants and employees. Please report any incidents to RMI management.
Age requirements
All participants must be 18 years old at the time of registration.
Photo Release
RMI’s Photo Release outlines the terms and conditions for using your likeness in photographs, videos, or other digital media.
I hereby grant Rainier Mountaineering, Inc. (RMI) or its affiliates permission to use my likeness in a photograph, video, or other digital media (“photo”) in any and all of its publications, including web-based publications. By granting permission, you allow RMI to utilize these media for lawful purposes.
Here are the key points:
- Authorization: You authorize RMI to edit, alter, copy, exhibit, publish, or distribute the photos.
- Ownership: All photos become the property of RMI and will not be returned.
- Compensation: You will not be compensated for these uses.
- Rights: RMI exclusively owns all rights to the images, videos, and recordings and to any derivative works created from them.
- Waiver: You waive the right to inspect or approve printed or electronic copies.
- Release: You release Rainier Mountaineering, Inc. and its assigns and licensees from any claims arising from these uses, including defamation, invasion of privacy, rights of publicity, or copyright.
- Hold Harmless: You hold harmless, release, and forever discharge RMI or its affiliates from any and all claims, demands, and causes of action which I, my heirs, representatives, executors, administrators, or any other persons acting on my behalf or on behalf of my estate have or may have by reason of this authorization.
General Policies
RMI's program schedule and itineraries may change based on various factors such as route conditions, weather, group strength, terrain, and other environmental factors. RMI has the full discretion to modify plans in response to these or other factors, including adjustments to program fees, schedule, itinerary, or staffing as necessary to ensure the safety and proper conduct of the program. Once a program begins, the Lead Guide will determine any changes to the itinerary, including the possibility of ending the program early if continuing poses risks to the group's safety, health, or well-being.
RMI reserves the right to cancel any program due to insufficient participation, weather, route conditions, or other reasons. In such cases, we will try to reschedule the Participant for another program date. If rescheduling is not possible, RMI will refund the Participant for all program fees paid, minus any non-refundable payments made on the Participant's behalf prior to cancellation, such as the Cost Recovery Fee and Entrance Fee paid to the National Park Service. RMI is not responsible for any non-refundable expenses incurred by the Participant in preparation for the program, such as airline tickets, hotel reservations, rental cars, or equipment purchases or rentals.
Once a program has started, no refunds or credits will be given for cancellations due to weather, route conditions, or other factors that could jeopardize the group's health, safety, or well-being. Additionally, if the Participant chooses not to begin or decides to leave the program early, no refunds or credits will be issued. The Participant will be responsible for any extra costs related to early departure, including evacuation, transportation, hotel reservations, and meals.
Program costs are offered as a package, and no refunds or credits will be provided for unused portions. The Participant acknowledges that RMI is not responsible for any travel or hospitality services provided by other companies, including airlines, hotels, rental cars, and transportation services. RMI is also not liable for any act, error, omission, injury, loss, delay, or danger caused by a travel or hospitality provider. The Participant will be responsible for any costs resulting from travel delays, missed connections, or lost baggage that require additional arrangements to rejoin the program.
What is the Guide-to Client Ratio on this program?
We use a 1 guide per 2 climber ratio on the Kautz Glacier route.
What is the maximum group size?
The maximum group size of any program anywhere on Mt. Rainier is 12 individuals, including guides.
What is included in the cost of the program?
- RMI leadership
- Transportation from Rainier BaseCamp to Mt. Rainier National Park as indicated in the trip itinerary.
- NPS Entrance Fee
- NPS Cost Recovery Fee
- NPS Wilderness Fee
- Group gear including tents and stoves (for heating water)
- Climbing ropes
- Blue bags (for solid waste disposal)
ENTRY INTO MT. RAINIER NATIONAL PARK
All our Mt. Rainier programs begin at Rainier BaseCamp in Ashford. All Mt. Rainier climbs, seminars and schools include transportation for our climbers from Rainier BaseCamp to Paradise or to the White River Entrance.
If you plan to enter Mt. Rainier National Park in a personal vehicle, please visit the NPS website for information on entrance fees and timed reservations.
WHAT ARE MY CHANCES OF REACHING THE SUMMIT OF MT RAINIER?
There are three main categories that generally prevent climbers from reaching the summit: weather, route conditions, and individual fitness.
WEATHER
In an average year, 21% of our climbs do not reach the summit due to weather, route conditions, or both.
Avalanche hazards, high winds, poor visibility, rain, and snow, can singly or in conjunction with the other elements, impact our ability to safely climb. Your guides are charged with managing the risks encountered on the climb and maintaining a reasonable margin of safety.
If weather conditions reduce our margin of safety to an unacceptable level, we will no longer be able to climb. This may mean we turn around, or we may not even ascend above camp.
THE ROUTE
On Mt. Rainier, guides work on the route continually throughout the climbing season. Route work involves rerouting to avoid hazards. This can include overhead (icefall and rockfall) and underfoot (crevasses and steep slopes) hazards. As the route becomes more complex and steeper throughout the season, route work can include kicking steps, chopping, shoveling, setting running belays, fixed lines, and ladders. Some changes occur daily on the route and may necessitate a quick fix by your guide team during a climb. A larger reroute may be needed multiple times throughout our season, requiring a guide team to work multiple days to establish a new route.
Generally speaking, the route is never closed or “out,” and there is usually a way to the top. However, it might not have the appropriate margin of safety needed for our climbers (it might require more advanced mountaineering skills and experience levels). When this happens, all the guide services on the mountain coordinate resources to establish a new route. Like mountain weather, we manage but can’t control the climbing route, and it is not unheard of for the route to be unclimbable for multiple days. While the route work is being done, we will ascend with our climbers as high as is safely possible and appropriate on the existing route.
FITNESS
Fitness is the one factor that you have the most control of, and that has the highest impact on your success, safety, and fun. Mountaineering requires a high degree of physical stamina and mental toughness. Even for the healthiest and fittest individuals, climbing mountains qualifies as an extremely challenging endeavor. The length of the climbing route dictates the required fitness for the climb. We do not have fast or slow rope teams – our teams move at a steady pace determined by the duration and complexity of the given route.
Climbers do have control over their ability to affect their mental fortitude to some extent, and their fitness, to a very large extent. Therefore, you can maximize your chances of a successful summit climb by focusing on individual fitness.

Climbers rated RMI with an average of 4.91 stars across 123 ratings


