


Travel Consultant
RMI has partnered with Erin Rountree to provide comprehensive travel support. We have been working with Erin for many years. As an independent agent of the Travel Society, she has booked countless miles for adventure travelers across the globe and is extremely knowledgeable about the travel needs of our programs. Please call (208) 788-2870 or send email to [email protected].
Travel Insurance
Travel insurance is required for this trip.
Your travel insurance policy should include trip cancellation, trip interruption, travel delay, baggage loss or delay, medical expenses, and evacuation.
Navigating through the different options for travel insurance can be challenging. When purchasing Travel Insurance, here are a few items to consider:
- Read the fine print. Travel Insurance offers reimbursement when you must cancel your trip for an eligible reason for prepaid, non-refundable trip costs that you insure. However, there are exclusions, so make sure you understand the "eligible reasons."
- Confirm that your activity is an eligible "activity." Not all travel insurance policies will offer coverage for activities such as mountaineering, climbing, skiing, or trekking adventures. Policies can also exclude coverage for activities due to the gear used (crampons, ice axe), activities that go above specific elevations, or activities in a particular region of the world. If there are exclusions, you may need to add an "Adventure" or "Sports" package to help cover your activity.
- Verify that your state of residence is allowed with the policy that you are purchasing. Not all insurance companies offer policies in all 50 states.
- Contact your travel protection company directly for any questions you have regarding benefits or coverage.
TRAVELEX
In today’s changing travel environment, it’s important to protect your travel investment. Unforeseen events such as flight delays, baggage loss or even a sudden sickness or injury could impact your travel plans. For your convenience, we offer Travelex Insurance protection plans to help protect you and your travel investment against the unexpected.

For more information on the available plans visit Travelex Insurance Services or contact Travelex Insurance (800) 228-9792 and reference location number 47-0370.
The product descriptions provided here are only brief summaries and may be changed without notice. The full coverage terms and details, including limitations and exclusions, are contained in the insurance policy. Travelex Insurance Services, Inc. CA Agency License #0D10209. Insurance coverages underwritten by individual member companies of Zurich in North America, including Zurich American Insurance Company (NAIC #16535, state of domicile: New York). RETWEB
RIPCORD
Ripcord Rescue Travel Insurance is travel insurance designed for adventurers, including the best evacuation and rescue services available.

Benefits are tailored for adventurers and include:
- Rescue and evacuation from the point of illness or emergency to your home hospital of choice.
- Trip cancellation/interruption, primary medical expense coverage, sporting goods, baggage loss, emergency dental, Accidental Death & Dismemberment (AD&D) and more.
- Completely integrated one-stop program with a single contact for emergency services to travel assistance and insurance claims.
- 24/7 access to paramedics, nurses and military veterans.
- Security extraction in case of unexpected dangerous and chaotic events.
- Cancel For Any Reason (CFAR) options and pre-existing condition waiver within 14 days of your initial trip deposit.
Ripcord Rescue Travel Insurance is powered by Redpoint Resolutions, a medical and travel security risk company. Their team is comprised of special operations veterans, paramedics, Stanford Medicine affiliated physicians, former intelligence officers, insurance actuaries and global security experts with dozens of years of experience in theaters around the world. The Redpoint network covers the globe, making them uniquely equipped to provide elite rescue travel insurance – in every sense of the word. Whether it’s reimbursing you for a cancelled trip, paying your travel medical bills or evacuating you home in an emergency, Ripcord takes the worry out of your travel.
Travel Advisories / Warnings
Please confirm any current travel advisories/warnings as well as entry requirements with the U.S. Department of State.
Getting There
Several U.S. airlines offer daily flights to Quito, Ecuador (UIO). Flights generally arrive late in the evening on Day 1 of the itinerary.
Flights departing Quito may be booked for any time on the final day of the program.
Entry Information
A valid passport is required when traveling to Ecuador. Your passport must be valid for 6 months beyond the expected return date. U.S. passport holders may stay up to 90 days without a visa.
We suggest making a copy of the first two pages of your passport and keeping them in a separate bag as a backup. A copy should also be left with your emergency contact.
Airport Arrival
Upon arrival at the Quito airport, follow the signs to the Arrivals Building. Proceed to the Immigrations desk for foreign travelers. They will provide you with an entrance permit adequate for your stay. Please check the date to ensure it covers your complete stay in Ecuador.
Once you receive your bags from Baggage Claim, you will proceed to Customs. There will be a random selection of bags for inspection. Be sure to keep all your bags together.
After you have gathered your baggage and passed through Customs you will find a desk in front of the exit gate where you can ask for a taxi. Take a taxi to our hotel. A fixed price of approximately $25 to $30 is in place.
In-Country Transportation
The provided transportation in Ecuador as stated in the itinerary is via authorized taxi or private vehicle.
Immunizations & Travel Medicine
For the most current information on inoculation requirements and recommendations, please refer to the Centers for Diseases Control and Prevention.
Traveler's Health
Travelers may suffer from upset stomachs when in foreign countries. There are some basic rules, however, that can help keep you healthy.
- Hygiene - It is important that you wash your hands thoroughly before meals and after using the restroom. If water is not available for washing, we recommend using a hand sanitizer.
- Water - The number one rule is: don't drink the water, and that includes shower water and ice! Brush your teeth with purified water rather than tap water. You should check bottled water for a good seal and use a napkin to wipe excess moisture in drinking glasses. Take care with fruit juice, particularly if it has been diluted with water. Carefully clean the tops of bottled beverages before opening.
- Food - If it is cooked, boiled, or can be peeled, you can usually eat it. Salads and fruits should be washed with purified water or peeled where possible. Be wary of ice cream and shellfish. Always avoid any undercooked meat.
Medical Emergencies
Excellent care for minor illnesses and injuries is readily available. In the event of more serious illnesses or injuries, we recommend transport to any of the Level 1 care centers in Quito.
Ecuador Country Facts
Ecuador is named for the Equator, which crosses through the northern reaches of the country. While it is the smallest Andean country, it has four remarkably distinct and diverse regions: the coastal plains, the Andean highlands, the jungles of the upper Amazon basin, and the Galapagos Islands.
Ecuador is the world's largest exporter of bananas. The Andean highlands contain beautiful and productive farmland, often seen in a classic patchwork pattern. Oil from the rich eastern jungles enriches the economy. The volcanic Galapagos Islands bring tourism revenue with its unique reptiles, birds, and plants.
The country is divided ethnically as well as regionally. About 10 percent of the population is of European descent, about a quarter belong to indigenous cultures, and many others are of mixed ethnicity.
The capital, Quito, is the second highest capital in South America. Quito is set beautifully in a highland valley at 9,300'.
By the beginning of the 16th century Quito was ruled by the Incas and was the northern capital of their empire. When the Spanish arrived, the area was razed by a general of Atahualpa to make certain it did not fall into Spanish hands. Thus the colonial city was built on the Inca ruins in 1534 by a lieutenant of Pizarro. The current layout of the old city dates back to the 18th century, complete with cobble-stone streets, parks, plazas and colonial architecture.
Weather
The weather in Quito and while traveling to and from the mountains can be very warm. We recommend bringing a pair of shorts and a T-shirt. For current weather conditions, check Weather Underground.
The western mountains, which include Cotopaxi and the Illinizas, experience two dry seasons. The first is from July through August, and the second is in December and January.
The eastern mountains, which include Cayambe and Antisana, are best climbed from June through January. The wettest months of the year for these peaks are February through May.
These mountains are climbed throughout the entire year, with the best mountain snowpack on Chimborazo, Cayambe and Antisana found between October and June.
While there can be no guarantees of perfect weather in the mountains, our expeditions take full advantage of the weather and snowpack conditions for these peaks, and utilize those months for optimal climbing experiences.
Cultural Etiquette
The people of Ecuador are generally very warm and friendly to tourists. Although it is not expected that we dress formally, we should dress modestly. Casual and comfortable clothing is suggested along with comfortable shoes. Showing expensive cameras, watches, jewelry, etc. is considered unseemly and may attract unwanted attention.
When entering a shop or home, politely use a greeting such as buenos días (good day), buenas tardes (good afternoon), buenas noches (good night). Similarly, upon leaving, even if you've had only minimal contact, say adios (goodbye) or hasta luego (see you later).
On city streets, children selling small items and shining shoes can be quite persistent. Some ask directly for money. To keep from being hassled, a polite but firm "No, gracias" is generally sufficient.
It is expected that you engage in some degree of bargaining for market or street purchases. This is fun, and should be taken lightly.
Electricity
Electricity in Ecuador is the same as in the United States: the ungrounded two-prong plug is used for 110 volt, 60 hertz appliances. Appliances with three prongs or an enlarged prong may require an adapter.
Money
The current currency of Ecuador is the U.S. Dollar. Check a financial newspaper or www.xe.com for the current exchange rate prior to departure.
We suggest bringing $500 - $700 total for personal spending money including restaurant meals, drinks, pocket money, and the Support Staff Tip Pool.
Cash machines are readily available in Quito, but become increasingly difficult to find outside of urban areas.
Credit cards are accepted in most, but not all, areas.
Everyone has a preferred way to carry money. Some use money belts, others have hidden pockets. Whatever you do, be aware of pickpockets and thieves in any area which caters to tourists.
Tipping
Everyone approaches tipping a little differently. Whether or not a person tips, and how much, is completely dependent upon the individual; here are some suggested tipping guidelines for your trip.
Local waiters, drivers, and other service personnel expect to be tipped. Ten to fifteen percent is standard. Some restaurants and hotels add a 10% service fee to bills in which case, no further tip is required.
Support Staff Tip Pool: We recommend that each climber contribute $200 to the Tip Pool. This is collected at the beginning of the trip and will cover group tips for all our support and mountain staff throughout the program.
Our guides work hard to ensure your well-being and success on the mountain. If you have a positive experience, gratuities are an excellent way to show your appreciation. Amounts are at your discretion and should be based on your level of enjoyment. Tips for excellent service normally average 10 – 15% of the cost of the program. If you would rather not bring the guide gratuity with you on the trip, you can send a check or call the RMI office to pay with a credit card upon your return.
Resources
Rob Rachowiecki and Mark Thurber, Ecuador: Climbing and Hiking Guide. VIVA Publishing, 2013.
The authors have combined many years of Ecuador experience into a useful, readable and comprehensive guide.
Ecuador Explorer and The Best of Ecuador are thorough websites describing Ecuador travel and facts.
Qualifications
This trip is open to all individuals in excellent physical condition with previous climbing experience. Prior knowledge and experience with rope travel, the use of crampons, and ice axe arrest is required. It is a great first trip to altitudes above 15,000'.
Our experience shows that individuals perform better and enjoy the adventure more if they have a high degree of fitness and comfort with basic mountaineering skills. This program’s high altitude and snowy terrain contribute to make this a very worthwhile challenge.
Qualifying Programs
Recommended climbing experiences prior to the Ecuador Seminar - Chimborazo include:
Mt. Rainier Expedition Skills Seminar - Emmons
Mt. Rainier Expedition Skills Seminar - Kautz
Mt. Rainier Expedition Skills Seminar - Muir
Mt. Rainier Expedition Skills Seminar - Paradise
Mt. Rainier Mt. Rainier - Five Day Climb
Mt. Rainier Mt. Rainier - Four Day Climb
Expedition Skills Seminar - Peru
Get In The Best Shape Of Your Life And Then Go Climb A Mountain
Create A Fitness And Training Program
Physical Fitness Training
Mountaineering requires a high degree of physical stamina and mental toughness. Even for the healthiest and fittest individuals, climbing mountains qualifies as an extremely challenging endeavor.
- Start immediately. Start a rigorous fitness and training program now with the goal of arriving in top physical condition and confident in your skills.
- Be intentional. Focus on gaining the necessary strength, stamina and skills to meet the physical and technical demands of the climb.
- Be sport-specific. The best fitness and training program mimics the physical and technical demands of your climbing objective. The closer you get to your program date, the more your training should resemble the climbing.
For the Ecuador Seminar - Chimborazo, you are preparing for:
- Steep hiking with a 40-60 lb load
- Steep climbing on our summit days with a 20-25 lb load
- A 10-12+ hour summit day with multiple summit days throughout the program
- Mountaineering techniques requiring core strength and flexibility
Nothing ensures a personally successful adventure like your level of fitness and training. Bottom line: Plan on being in the best shape of your life and ready for a very challenging adventure!
Please refer to our Resources for Mountaineering Fitness and Training for detailed fitness and training information.
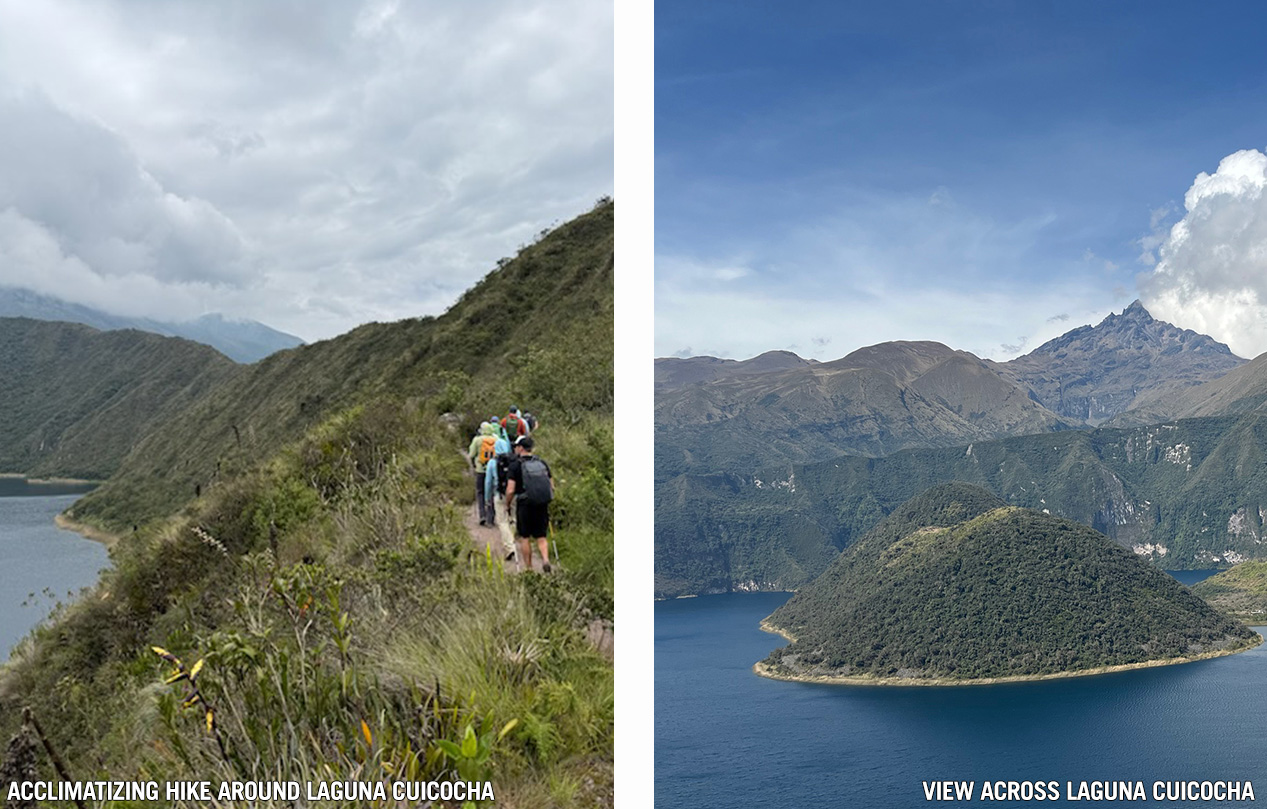
Acclimatization
The key to climbing high is proper acclimatization. Our program follows a calculated ascent profile which allows time for your body to adjust to the altitude.
Excellent physical conditioning significantly increases your ability to acclimatize as you ascend. Climbers in excellent physical condition simply have more energy to commit to the acclimatization process throughout the days and nights of the ascent, allowing their bodies to adjust to the altitude more easily.
Finally, physical performance and acclimatization are also related to how well you have taken care of yourself throughout the hours, days and weeks prior to summit day. Arriving healthy and well-rested, maintaining proper hydration and caloric intake, and protecting against unnecessary heat loss (staying warm) are all key factors in an individual’s success on an expedition such as this.
What You’ll Need
A list of required personal equipment accompanies every RMI program, and the thought process behind each item is much greater than simply “preparing for the worst and hoping for the best.” The list for your program takes into account factors such as: seasonality, route conditions, weather, elevation and more. As such, this list is framed within the broadest of contexts and is dynamic by its very nature. Therefore, certain variables (additions and/or subtractions) are inherent within such an all-encompassing list. We make every effort to recommend only top of the line clothing and technical gear and it is never our intention for you to buy or rent unnecessary gear.
The Guide Pick is an example of the listed item, giving you an idea of the material and specifications of the item. This exact item does not need to be purchased or used; however, any item you choose must have similar characteristics and performance abilities to the Guide Pick.
RMI Guides concur on the potential necessity of every item, thus every item on the list is required at gear check. However, guides may also have suggestions derived from their experience, some of which will vary from a given list. The guides’ recommendation whether to bring along or leave behind certain item(s) comes during the gear check, when the team first meets. Occasionally this recommendation comes at the expense of having previously purchased an item. If a guide presents the option of leaving behind certain item(s) on the list of required equipment, it is for a reason. Their recommendation may be related to the weather, route conditions, freezing level, perceived strength of the party, or desired pack weight.
Ultimately, there will never be a consensus for a “perfect” equipment list for an ascent. It does not exist because of the multitude of variables faced by climbers throughout the climb. Please follow this equipment list closely so that you will arrive for the gear check with all the required items. Keep in mind the list is not black and white, fine tuning will occur once you meet with your guide. Have a great climb!
-
 Most of the required equipment is available for rent or purchase from our affiliate Whittaker Mountaineering. RMI climbers receive a 10% discount on new clothing and equipment items ordered from Whittaker Mountaineering.
Shop Your Equipment List // Rent new equipment for your climb
Equipment List
Pack & Travel

100-120+ liter bag(s) made of tough material with rugged zippers.

Bring as needed. Make sure these are TSA-compliant.

Your pack must be large enough for your layers, climbing gear, and food, as well as a portion of your tent and your share of group equipment. You will not need a separate summit pack.

A 25+ liter day pack to use as carry-on or while sightseeing.
Sleeping Bag & Pad

We recommend a bag rated between 20° and 0° F. Allow ample room for movement. We recommend down over synthetic for its light weight, warmth, and packability. If you know you sleep cold, consider a 0° F bag.


A full-length inflatable pad.

A full-length closed cell foam pad, used in combination with the inflatable sleeping pad.
Technical Gear

The length of your axe depends on your height. Use the following general mountaineering formula: up to 5'8", use a 65 cm axe; 5'8" to 6'2", use a 70 cm axe; and taller, use a 75 cm axe. If you hold the axe so that it hangs comfortably at your side, the spike of the axe should still be a few inches above the ground.

We recommend a comfortable, adjustable alpine climbing harness. Removable, drop seat, or adjustable leg loops are convenient for managing your clothing layers over the course of the climb and facilitate going to the bathroom.

Used for clipping into the climbing rope.

Used for clipping into anchors, etc.


Automatic or semi-automatic 12-point adjustable steel crampons with anti-balling plates designed for general mountaineering use.
Bring extra batteries appropriate to the duration of the climb.

We recommend lightweight and collapsible poles with snow baskets.
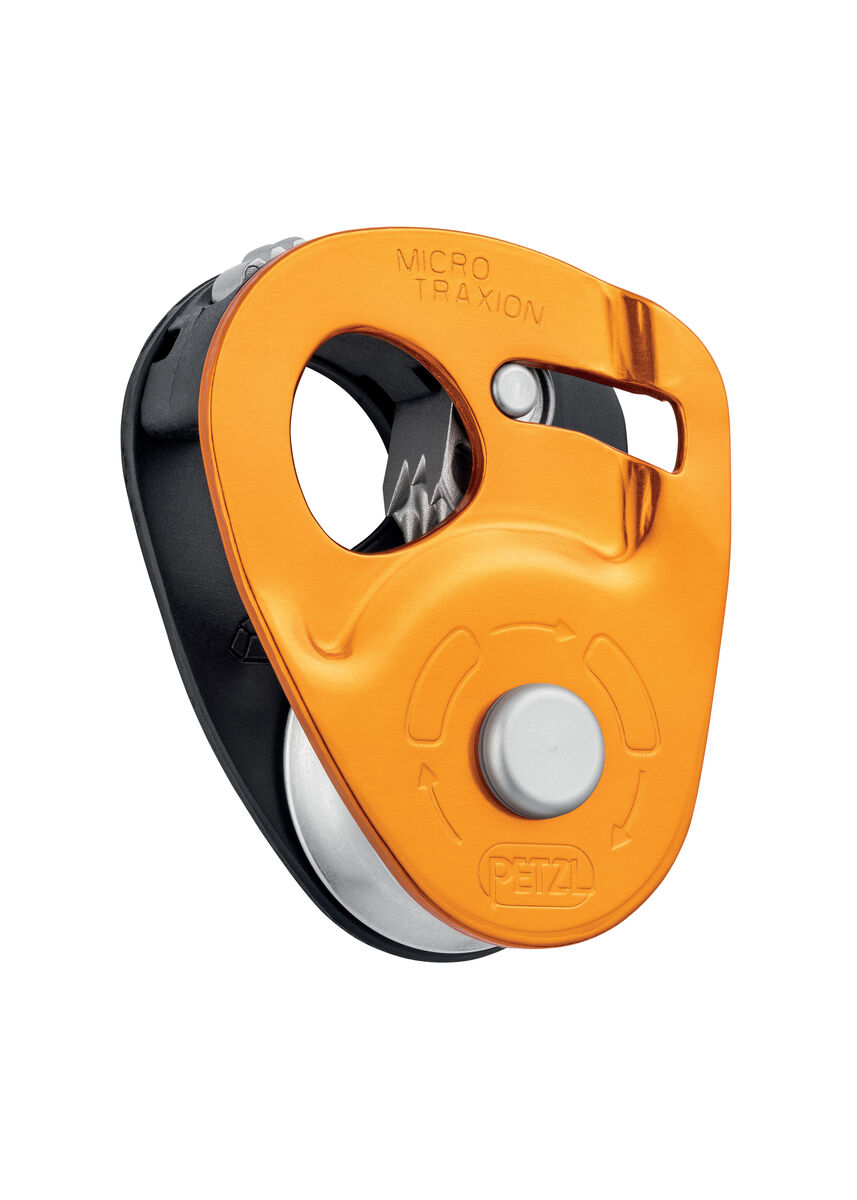
A Progress Capture device designed for Crevasse Rescue, Hauling and Self- Rescue. While not mandatory this device increases efficiency while hauling and while setting up our rope systems.
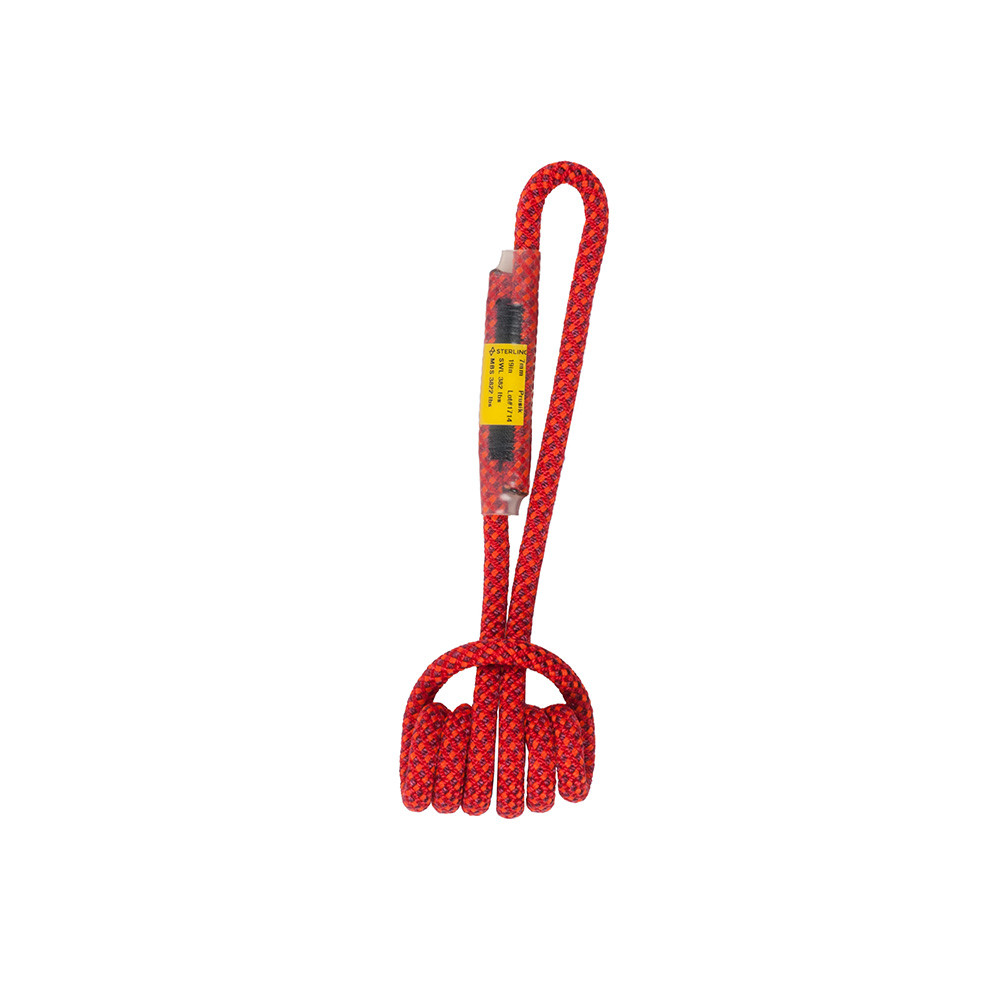
Premade sewn loops are used for friction hitches on climbs and rescue. Neat, efficient and quick to store. Most guides prefer these premade options for their ease and utility.

6 mm cordelette in one continuous length OR precut into two 4' sections OR two 13.5" Sterling Hollow Block sewn loops.
7 mm cordelette in one continuous length OR one 240cm dyneema sling.
Head

A UIAA (Union Internationale des Associations d’Alpinisme) or CE (European Committee for Standardization) certified climbing helmet.

Wool or synthetic. It should provide warmth but also be thin enough to fit underneath a climbing helmet.
A hat without a button on top will fit better and be more comfortable under a helmet.

A Buff provides versatile head and neck protection. A neck gaiter is also acceptable.

Start with fresh batteries and bring extra set(s) of batteries appropriate to the duration of the trip.

Glacier glasses are protective sunglasses that provide close to 100% frame coverage (wrap-around frames and side shields ensure no light can enter from the top, bottom, and sides of the glasses) and transmit less than 10% of visual light.

Amber or rose-tinted goggles for adverse weather. On windy days, climbers, especially contact lens wearers, may find photochromatic lenses the most versatile in a variety of light conditions.
Hands
Each glove layer is worn separately as conditions change during the climb.

Light weight liner or softshell gloves. Lighter colors absorb less sunlight while still offering UV protection.

Wind- and water-resistant, insulated mountain gloves.

Wind- and water-resistant, insulated gloves or mittens. These also serve as emergency backups if you drop or lose a lighter-weight glove.
Upper Body
We recommend a minimum of five upper body layers, all of which can be used in conjunction with each other. Two of these should be insulating layers, one light, and one medium, that fit well together. Today there are many different layering systems to choose from, including fleece, softshell, down, and synthetic options.

Long-sleeve wool or synthetic top. Light weight, light-colored, hooded baselayers (sun hoodys) are highly recommended for sun protection.

One step up in warmth and bulk from a baselayer. A technical fleece makes an ideal light weight insulating layer.

A down, synthetic, or softshell hoody makes a great midlayer.

An uninsulated, waterproof shell jacket with hood.

Your expedition-style heavy parka must extend below the waist, have an insulated hood, and be able to fit over the rest of your upper body layers. While the parka is worn primarily at rest breaks on summit day, it also serves as an emergency garment if needed. We recommend down rather than synthetic fill.

We recommend a moisture-wicking, active-wear bra.
Lower Body
We recommend a system of four layers, all of which can be used in conjunction with each other. Products which combine several layers into one garment, such as traditional ski pants, don’t work well as they don’t offer the versatility of a layering system.

Non-cotton briefs or boxers.

Synthetic or wool.

Softshell climbing pants can be worn in combination with a base layer on colder days, or alone on warmer days.

Non-insulated, waterproof shell pants must be able to fit comfortable over your baselayer bottoms and softshell climbing pants. Full side zippers or 7/8 side zippers are required so that shell pants can be put on while wearing boots and crampons.

A light weight, synthetic pair of pants is a good option for the approach trek when hiking at lower altitudes and in warm conditions. These pants have no insulation, are typically made of thin nylon, and commonly feature zippers to convert between pants and shorts.
Feet
We recommend modern hybrid double boots for this climb because they provide the best balance of weight, comfort, and insulation. Insulated single mountaineering boots are also adequate but might result in cold feet. Bring one pair of chemical foot warmers per summit day if you are using single mountaineering boots.

SINGLE BOOTS: Insulated, full-shank, and crampon-compatible leather or synthetic boots designed for mountaineering. Single boots tend to be lighter and more comfortable than double boots at the expense of warmth.

DOUBLE BOOTS: Insulated double boots designed for mountaineering. Plastic-shelled models are acceptable, though modern synthetic models are lighter and more comfortable.

A pair of lightweight boots for approaches and hiking on rugged terrain. We recommend a waterproof, mid-top boot for better stability and ankle support.

Great for traveling and wearing around town or camp. A pair of tennis shoes or light hikers works well.

A knee-length pair of gaiters, large enough to fit over your mountaineering boots. This will protect you from catching your crampon spikes on loose clothing. Not needed if using a boot with an integrated gaiter.

Either wool or synthetic. Whatever sock combination you are accustomed to wearing during your training or previous adventures (whether single medium weight socks, a medium weight with a liner sock, two medium weight socks together, etc.), should work just fine for this climb.
First Aid & Medications
We recommend you speak with your physician about which medications you should have for high-altitude climbing. These medications are only used in emergency situations, and if someone is showing symptoms of HAPE or HACE, our standard protocol is for immediate descent. We do not take any of these medications prophylactically, and please talk with your guide before taking medications.
We require each climber to have the following medications:
Broad spectrum antibiotics for respiratory and gastrointestinal problems like Azithromycin (250mg tablets).
125mg tablets for the prevention or treatment of Acute Mountain Sickness. A normal prescription is 125mg tablets, twice a day. Recommend 15 - 20 tablets.
4mg tablets for the treatment of altitude illness. Recommend 12 tablets.
30mg slow-release tablets for the prevention or treatment of high-altitude pulmonary edema (HAPE). Recommend 8 - 10 tablets.

Our guides carry comprehensive medical kits, so keep yours small and light. We recommend a selection of adhesive bandages, antibiotic ointment, Moleskin and blister care, medical tape and/or duct tape, cough drops, basic painkillers, an antacid, an anti-diarrheal, and personal medications.
Personal Items
-450x0.jpg)
See the Food tab for suggestions and quantities.

Packable plastic bowl. Collapsable models can work but must be handled carefully to avoid unintended collapsing. A lid is a great feature.

Insulated outdoor-style mug. We recommend a model with a removable lid, which helps retain heat and prevent spills. You may also choose to use 0.5L insulated bottle or a 0.5L Nalgene.

A spoon or spork made of durable plastic or anodized metal. A long-handled spoon can be nice, especially if eating from a freeze-dried meal pouch.

One-liter water bottles with wide mouths made of co-polyester (BPA-free plastic).


Heavy-duty trash compacter bags for use as waterproof pack/stuff sack liners. You can also use a waterproof pack liner.


Include toilet paper, hand sanitizer, toothbrush and toothpaste, and wet wipes. Bring a quantity appropriate to the duration of your trip.

We recommend small tubes of SPF 30 or higher, which can be carried in pockets for easy access and to prevent freezing.


Spare prescription glasses if you wear contact lenses/eyeglasses.


Practice using this before coming on the climb!

Many smartphones have excellent cameras. Action cameras, small point-and-shoots, and compact dSLRs are lightweight and work well at altitude.

A small power bank, enough to charge a phone or e-reader several times.
For charging personal electronics while traveling internationally.
Travel Clothes

We recommend bringing a selection of clothing to wear while traveling, sightseeing and dining.
Travel Documents
Valid for six months beyond your return date.
The first two pages of your passport.
Pre-Trip Checklist
Purchase travel insurance.
Purchase airplane tickets.
Reserve rental equipment.
Be in the best shape of your life!
Provided Equipment
RMI provides the following equipment for your program: huts, stoves, group cooking equipment, fuel, climbing ropes, climbing anchors, avalanche probes, shovels, and blue bags (for solid waste disposal).
Every guide on your climb will carry rescue equipment and a first aid kit. Each climb has two-way radios and a satellite phone for emergency contact.
Meals
On the Ecuador Seminar - Chimborazo you will need 10 mountain lunches. All of your mountain lunch items should weigh 5 - 6 lb.
Breakfast and dinner meals on the mountain are included as indicated in our Trip Itinerary. With the exception of hotel breakfasts, most restaurant meals are on your own. You are responsible for your own bottled water and drinks.
Mountain Lunches
Mountain lunches are eaten during short breaks throughout the day. We continually snack to keep our energy levels up while we climb - lunch begins just after breakfast and ends just before dinner! Avoid packing any items that require preparation or hot water.
The importance of having foods that are genuinely enjoyed cannot be overstated. Eating properly is the key to maintaining strength while in the mountains. In order to combat the loss of appetite at altitude we aim to have a variety of foods that stimulate the whole palate, from sweet to sour to salty.
Recommended mountain lunch items: dry salami, smoked salmon, jerky (turkey, beef, fish), small cans of tuna fish, individually wrapped cheeses such as Laughing Cow or Baby Bell, crackers, bagels, candy bars, hard candies (Jolly Ranchers, Toffees, Life Savers), Gummy Bears, sour candies (Sweet Tarts), cookies, dried fruit, nuts, energy bars, GORP mixes, and drink mixes (Gatorade/Kool-Aid).
We may have a chance to purchase additional food in Ecuador, but we recommend you take what you need and only supplement with local food if necessary.
Breakfast
The breakfast menu includes items such as instant oatmeal, cold cereals (granola), breakfast bars (Kashi, Kudos), hot drinks (coffee, tea, cocoa, cider) and local fresh fruit.
Dinner
Dinner usually begins with soup and ends with dessert, followed by a round of hot drinks. Healthy one-pot meals, incorporating fresh local food whenever practical, are served as the main course. One typical main course dinner might be spaghetti with sausage and fresh vegetables. Another meal might be chicken fajitas with cheese, tortillas, onions, and peppers. There are limitations, but the menu is planned to offer good variety and ample portions.
Payments
Deposit Payments: A non-refundable deposit payment of $900 per person secures your reservation.
- Deposit payments may be made via MasterCard, Visa, American Express*, e-check/ACH, or check from a U.S. bank.
Balance Payments: The balance payment is due 120 days before the start of your program.
- Balance payments may be made via MasterCard, Visa, American Express*, e-check/ACH, check from a U.S. bank or wire transfer.**
- **Wire transfers must cover all fees charged by your bank. The amount of the incoming wire to our bank must equal the balance payment amount.
- A payment reminder is emailed approximately three weeks before your payment due date. If your balance payment is not received 120 days before the start of your program, your reservation will be canceled, and all program fees will be forfeited.
- Payment in full is required when registering for a program within 120 days of the departure date.
*There is a 3% surcharge on all credit/debit card transactions.
Cancellation
The $900 per person deposit is non-refundable and non-transferable.
- All cancellations require written notification. Once the RMI Office receives your written notification of cancellation, the following apply:
- If you cancel 120 or more days before the start of your program, the $900 per person deposit will not be refunded.
- If you cancel less than 120 days before the start of your program, no refunds will be issued.
Due to the time-sensitive nature of these programs, and the amount of preparation time required for this program, we strictly adhere to our policy and cannot make exceptions for any reason.
Cancellation Insurance
We require that everyone purchase travel insurance. Please see our Travel Tab for details.
Land Cost
INCLUDED
- RMI Leadership
- Hotel accommodations as indicated in the itinerary, based on double occupancy*
- All park entrance fees
- Sight seeing arrangements as indicated in the itinerary
- All group transportation in country as indicated in the itinerary
- All group cooking, climbing and camping equipment
NOT INCLUDED
- International airfare
- Travel insurance, medical evacuation insurance and security evacuation insurance
- Excess baggage fees and departure taxes
- Meals not included in the itinerary
- Bottled water and personal drinks
- Customary guide gratuities
- Support Staff Tip Pool (we suggest $200 per person)
- Additional room charges including laundry service and other personal expenses
- Hotel accommodations not indicated in the itinerary
- Transfer from Quito Hotel to Airport for outbound flight
- Medical, hospitalization and evacuation costs (by any means)
* Accommodations are based on double occupancy. A Single Supplement Fee will be charged to those occupying single accommodations by choice or circumstance. The single supplement is not available in huts, tents, or in all hotels.
Rainier Mountaineering, Inc. reserves the right to modify the land cost of a trip at any time before departure.
Risk Management
Please clearly understand that mountaineering is inherently hazardous. Managing risk is RMI’s number one priority. Our guides manage significant hazards inherent in mountaineering, but they cannot eliminate them. Objective hazards include rockfall, icefall, avalanches, slides or falls by individuals and rope teams on steeper slopes, weather-related problems including cold, heat, high winds, and other unnamed dangers that can occur while climbing.
You are choosing to engage in an activity in which guided and non-guided climbers have been injured or killed. While those accidents are indeed infrequent, they may occur at any time and be out of our control. We ask that participants acknowledge the risks and hazards of mountaineering and make their own choices about whether or not to engage in this activity.
PARTICIPANT Responsibilities
Mountaineering is both an individual challenge and a team endeavor. Each Participant is required to share in the responsibility of the safety and success of the team. For this reason, we ask that each Participant:
- Possess the climbing prerequisites required for this program.
- Possess the necessary physical and mental fitness required for this program.
- Be responsible for knowing all pre-departure information.
- Provide a signed Physician’s Certificate stating that the Participant is medically qualified to join this program.
- Update the RMI Office if there are any changes to your health or medical information before departure.
- Be properly attired and equipped as outlined in the Equipment List.
- Act in a considerate manner toward all team members and show respect for local customs, values, and traditions in the areas we travel.
- Help minimize our impact on the environment and follow appropriate Leave No Trace practices.
- Describe yourself, honestly and accurately, in terms of fitness, health, skills, abilities, and your equipment to your guide staff.
- Communicate with your guide staff on the mountain if there are any changes in your medications or health.
- Adhere to the advice of your guide staff.
- Continue to self-assess throughout the program, measuring your fitness, health, skills, and abilities against the demands required of the program.
RMI reserves the right to dismiss the Participant from a program or to send the Participant to a lower altitude at any time if the RMI Guide Staff determines, in its sole discretion, that the Participant is not physically, technically, or psychologically prepared for, or capable of participating in the program, or for any other reason that may compromise the safety, health or well-being of the Participant or the entire group. If this decision is made, the Participant will not receive any refunds or credits and will be financially responsible for any additional costs associated with an early departure, including but not limited to, evacuation, transportation, hotel reservations, meals, etc.
Zero Tolerance Harassment Policy
Rainier Mountaineering, Inc. (RMI) does not tolerate harassment or mistreatment of our participants or employees. Inappropriate conduct under this policy may include conduct that creates a disrespectful, intimidating, hostile, degrading, humiliating, or offensive environment for a participant or employee. Engaging in such conduct is a violation of this policy.
RMI may consider conduct to violate the policy even if it falls short of unlawful harassment under applicable law. When determining whether conduct violates this policy, we will consider whether a reasonable person could conclude that the conduct created an intimidating, hostile, degrading, or demeaning environment.
Violation of this policy may result in removal from a program, as well as refusal to provide services indefinitely. We place the utmost value on the safety of our participants and employees. Please report any incidents to RMI management.
Age requirements
All participants must be 18 years old at the time of registration.
Photo Release
RMI’s Photo Release outlines the terms and conditions for using your likeness in photographs, videos, or other digital media.
I hereby grant Rainier Mountaineering, Inc. (RMI) or its affiliates permission to use my likeness in a photograph, video, or other digital media (“photo”) in any and all of its publications, including web-based publications. By granting permission, you allow RMI to utilize these media for lawful purposes.
Here are the key points:
- Authorization: You authorize RMI to edit, alter, copy, exhibit, publish, or distribute the photos.
- Ownership: All photos become the property of RMI and will not be returned.
- Compensation: You will not be compensated for these uses.
- Rights: RMI exclusively owns all rights to the images, videos, and recordings and to any derivative works created from them.
- Waiver: You waive the right to inspect or approve printed or electronic copies.
- Release: You release Rainier Mountaineering, Inc. and its assigns and licensees from any claims arising from these uses, including defamation, invasion of privacy, rights of publicity, or copyright.
- Hold Harmless: You hold harmless, release, and forever discharge RMI or its affiliates from any and all claims, demands, and causes of action which I, my heirs, representatives, executors, administrators, or any other persons acting on my behalf or on behalf of my estate have or may have by reason of this authorization.
Summit Attempt
RMI cannot guarantee that you will reach the summit. Weather, route conditions, your own abilities, or the abilities of other climbers may create circumstances that make an ascent unsafe, and you or your entire group may have to turnaround without reaching the summit.
Failure to reach the summit due to a person’s own lack of fitness or to any of the events associated with mountaineering (such as weather, route conditions, avalanche hazard, team dynamics, etc.), are not Rainier Mountaineering, Inc.’s responsibility and will not result in a refund, credit, or reschedule.
General Policies
RMI’s program schedule and itineraries are subject to change or adjustment based on a number of factors. These include, but are not limited to, route conditions, weather, group strength, terrain, other environmental factors, and many other factors. RMI has complete discretion to change plans to accommodate any of these or other factors, including but not limited to increases in program fees, changes to program schedule or itinerary, and changes to guides or staff, as necessary for the proper and safe conduct of the program. Once the program has started, the Lead Guide will decide on any changes to the itinerary, including ending the program early if the continuation of the program may compromise the safety, health, or well-being of the group.
We reserve the right to cancel any program due to inadequate signups, weather, route conditions, or for any other reason. In such a case, we will make every effort to reschedule the Participant on a different program date. If rescheduling is not possible, we will issue the Participant a refund for all program fees paid to RMI, less any non-refundable payments made on behalf of the Participant to secure any of the included land costs provided for this program, including but not limited to, hotel accommodations, transportation, transfers, tours, group equipment and food, permits, and local outfitter services, prior to the cancellation of the program. Additionally, RMI cannot be responsible for any non-refundable expenses the Participant incurred in preparation for the program (i.e., airline tickets, hotel reservations, rental cars, equipment purchases or rentals, etc.).
Once a program begins, there are no refunds or credits for weather-related cancellations or for a program that may end early due to weather, route conditions, or any other circumstances that may compromise the health, safety, or well-being of the group. Furthermore, if the Participant decides for any reason not to begin a program or to discontinue a program at any time, no refunds or credits will be issued. The Participant will be responsible for all additional costs associated with an early departure, including, but not limited to evacuation, transportation, hotel reservations, meals, etc.
The Participant is responsible for any costs due to COVID-19, including but not limited to, any testing fees to enter another country, tests required to return to the US, and/or costs associated with medical care and/or quarantine such as hotel accommodations, meals, separate transportation, etc.
Land Costs are provided as a package, and refunds or credits will not be issued for any unused meals, accommodations, group transportation, or other unused costs. Accommodations are based on double occupancy. A Single Supplement Fee will be charged to those Participants occupying single accommodations either by choice or circumstance. If you are willing to share a room, we will make every effort to pair you with another same-gender team member. We will match willing same-gender team members based on the order of registration date. If we are unable to match you with another same-gender team member, a single supplement fee will be charged. The availability of single accommodations is limited in most of the hotels where we stay, and single accommodations are not available while in the mountains.
The Participant understands and agrees that RMI assumes no responsibility or liability in connection with any travel and hospitality services provided to the Participant by other companies in connection with the program, including but not limited to, the services provided by airlines, hotels, rental cars, and transportation companies and that RMI is not responsible for any act, error, omission, or any injury, loss, accident, delay, irregularity, or danger by a supplier of travel or hospitality services to the Participant in connection with the RMI program. The Participant will be responsible for all costs associated with any travel delays, missed connections, or missing baggage that requires additional arrangements (separate transportation, hotel accommodations, meals, etc.) to be made on your behalf for you or your baggage to rejoin the program.
Is it safe to travel in Ecuador?
We hold the perspective that travel to Ecuador (and any developing nation) includes risk, but not high risk. In order to safeguard our trips:
- We have hired a professional tour operator to coordinate our in-country logistics.
- We hire local guides familiar with the language, roads, customs, etc.
- We follow popular tourist thoroughfares, using private vehicles (not public transportation).
- We travel in groups and have tourist safety protocols in place (not flashing cash, not wearing expensive jewelry, etc.).
- Our guides are well-versed with our program and are accustomed to travel in a foreign country.
Take some time to visit the consular and travel warning pages at the U.S. Department of State. These pages offer good information and should be revisited occasionally as trip departure dates approach.
How does RMI approach these climbs differently from others so as to maximize the probability of reaching the summit?
We approach the climbs in three notably different ways:
- Our tried and true "ascent profile" (i.e., our incremental increase in sleeping altitudes over time to allow for proper acclimatization) is a good match for the length of our trip. This allows the group to be in the best possible condition to go for the summit.
- We plan an appropriate amount of climbing and culture for the length of a trip.
- Our world-class guides: their leadership and experience make a huge difference and are the primary reason we have so many repeat customers. Check out the RMI Difference on the Description page.
What is the food like on the mountain?
Our mountain meals are hearty and include fresh local fare where possible. Please see our Food details for an example of meals while on the mountain.
Is the water okay to drink?
We strongly advise against drinking tap water in Ecuador. Both bottled and boiled water are readily available and should be used for drinking water. Personal water filters or water treatment tablets are not needed.
How much weight am I carrying in my pack?
Most days, backpacks should weigh approximately 20 to 25 lbs as we only carry the day's snacks, water, clothing, etc. as needed on our acclimating hikes or summit climbs. The approaches to high huts/camps are the only exceptions. Then we may carry up to 50 lbs depending on the amount of group gear needed for the summit attempt.
What is the pace like?
We use an easy to moderate pace throughout the trip, depending on whether we are on an acclimating hike or on a summit climb. While the distances we cover on a daily basis are relatively short, the altitudes to which we travel are very high and the days of hiking and climbing are still challenging. Overall, our guides set a reasonable pace - at the appropriate speed to cover the distance we need that day without going too quickly or too slowly.
What are the huts like?
The Refugio Ruales Oleas Bergé at 15,300' on Cayambe is set in a spectacular location, directly at the start of the climbing route. It has a cooking area/kitchens, as well as bathrooms away from the main sleeping quarters. The Cayambe hut is comprised of smaller, separated rooms with bunk arrangements. The Cotopaxi hut is comprised of larger dormitory style rooms with multiple bunks per room.
What are the toilets like?
Toilets are available near the hut on Cayambe. On our acclimating hikes and summit climbs, where no toilets exist, we use bio-bags to collect our solid waste so that it may be transported off of the mountain. We recommend that you bring hand sanitizer to use after visiting the toilets.
How will I be able to stay connected with those at home?
We suggest bringing a smart phone or a WIFI-enabled device and using it where WIFI and internet services are available, as in Quito. On the climbs, however, WIFI access is not available. Cell service is widely available across most of Ecuador, see below.
Should I bring a cell phone?
Sure, cell phone coverage is generally available in and around towns. Check with your cell phone carrier to see if they offer international coverage in Ecuador and make sure you have the appropriate international plans and understand the associated rates.
RMI carries a satellite phone with the group through the entire trip for emergency use.
Do iPhones function well at high altitude?
Yes. However, the cold can impact the battery life making it necessary for it to be charged a few times on the trip.
Is a Kindle or Nook practical on this trip?
Yes, but if you wish to take it up on the mountain you will likely need to recharge it once in a while. We recommend downloading all of your desired books before arriving in Ecuador.

Climbers rated RMI with an average of 4.76 stars across 21 ratings


